Advanced TRX Control – available only when using OmniRig for radio control.
The standard window contains several basic functions for operating the transceiver. The list of devices is quite large and configured in Omnirig. If your device is not on the list, you can try to choose a similar one from the same manufacturer and it should work.
I have introduced the possibility of advanced control of selected TRX. These are :
- FT_710
- FT_891
- FT_991A,
- FTDX10
- FTDX101D
- FTDX101MP
- IC_705
- IC_7100
- IC_7300
- IC_7600 (in preparation)
The basic question is why? There are several answers:
- ability to configure remote work
- possibility of using advanced options by blind people
- Finding some features faster than searching through menus
- e.t.c….
First, you need to configure the program, click Menu->TRX Configuration
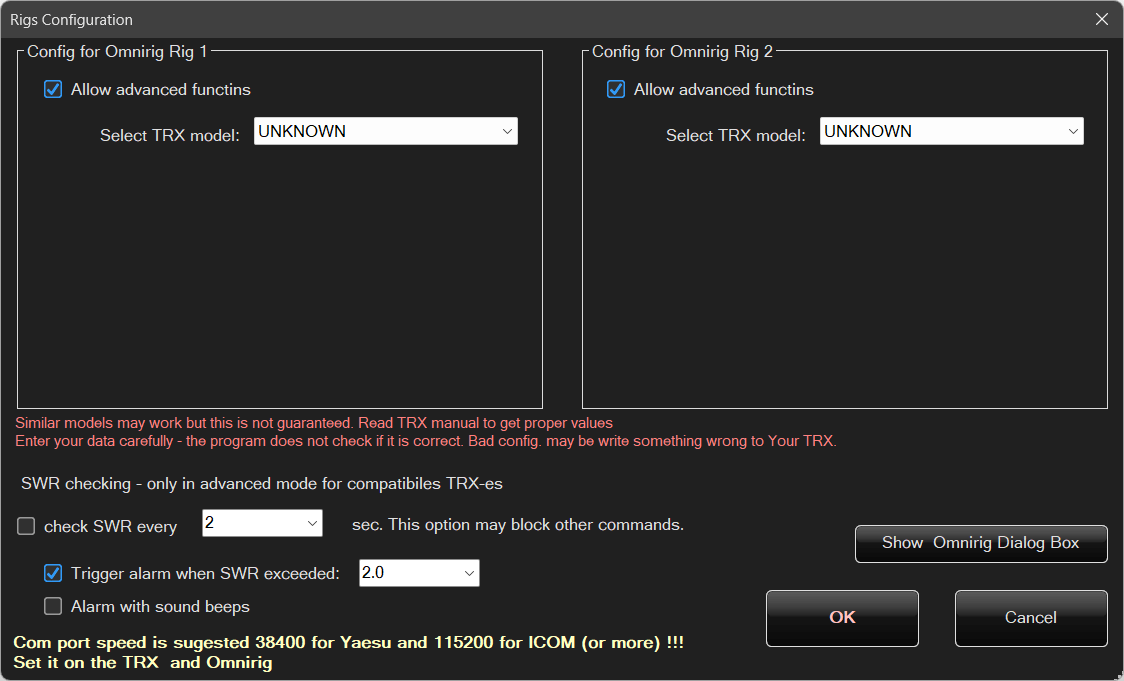
Here you configure the devices for Rig1 and Rig2 Omnirig respectively. Changing your Rig will also automatically change your device.

I didn’t have the opportunity to test all devices!!! Some options may not fully work properly.
Once you have selected and configured your device, you can enable the Show TRX Panel option.
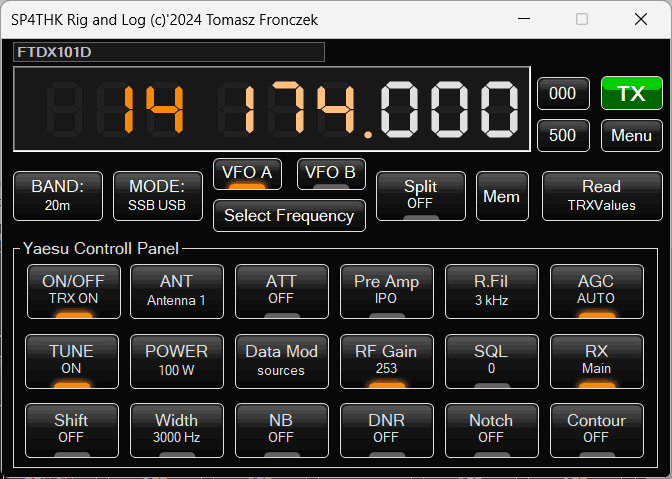
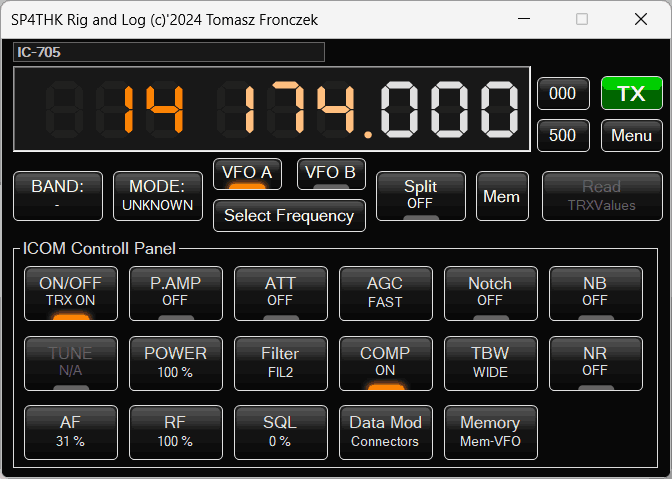
Depending on the selected device and model, the panels may differ.
When YASEU models are selected:
ICOM models:
All options have their own shortcut. Shortcuts are two-letter according to their name, e.g. the AGC key has the abbreviation CTRL-ALT-A and CTRL-ALT-G, with the exception of DNR:

If you use a program for the blind that reads information from the NVDA screen and the YAESU transceiver
The DNR function requires the ALT-CTRL-D ALT-CTRL-N shortcut, which conflicts with the default NVDA shortcut. You should either configure a different shortcut for NVDA or remember that, unlike in other DNR options, you can run ALT – CTRL D N as standard and additionally using ALT-CTRL-N ALT-CTRL-R if the default method conflicts with the NVDA configuration

Turning the transceiver on and off are functions that do not guarantee 100% success. It depends on several factors: Windows, devices, etc. Hence, there is a warning before using them that they may not work. And after running them, you may need to restart the omnirig program. (CTRL-F3 and OK)
After clicking simpler functions consisting of several options, a window opens with Menu buttons with their selection as in the BAND or MODE options.
Additionally, some options require a parameter, e.g. Shift or Width, then an advanced window will appear to control the inclusion of properties, as well as sliders to set the size.
Filters can be simple with one slider, or more complex with two or three. It depends on the specific filter and the manufacturer’s method of controlling certain settings:
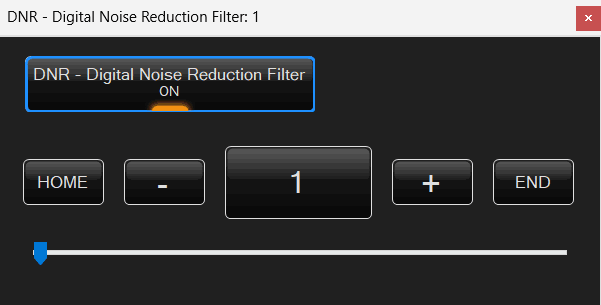
E.g. DNR filter:
Or the Noise Balancer filter:
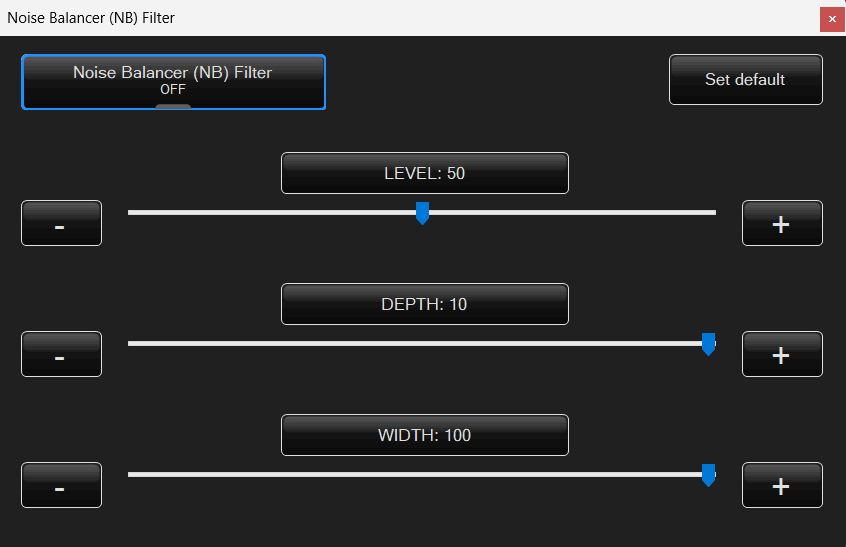
The value can be selected by moving the slider/sliders, but also by clicking on the large button in the middle with the displayed value of the function
Keyboard shortcuts work here too
The PLUS, MINUS, HOME, END, ESC keys need no introduction.
F2 has the same function as selecting the first button everywhere.
PLUS MINUS and CTRL keys – speed up changes. By default, the value changes by 1. e.g. if it was 10 we pressed plus the value will change to 11. using CTRL increases this value to 1/10 of the maximum. For example, for values from 0 to 100 it will be 10, from 0 to 255 it will be 25 and from 0 to 10 – 1.
CTRL-O – changes the filter state ON/OFF
CTRL-D – sets the default value
CTRL-F – allows you to enter the parameter from the keyboard.
Depending on the options, the appearance of the window may differ slightly, some keys may be unavailable or invisible.
In blind mode, the filter editing window is reduced to a minimum. Sliders and unnecessary buttons are hidden. Of course, shortcuts from them work. The ON/OFF button, the button with the default value and the button with the current value remain in the view.
This is what most filters look like, but there are minor differences.
If the filter has a value in Hz, clicking on the value will display the familiar frequency window.
If it is a number, a window for entering the number will be displayed.
Width in Yaesu is every step, so it is not set smoothly, but in steps. And editing the values will show you a list to choose from.
Some filters have many settings, so sometimes there will be a list to choose from with settings and at the very end there is an edit of the filter value with a already known window. It sounds complicated, but it’s worth cursing the options and everything will become clear.
ICOM tends to treat different variables differently, e.g. the value displayed in the device is from 0 to 100 or from 0 to 100% or from 0 to 15. This has nothing to do with the range of values that need to be sent. Once it is one to one, e.g. for the range 0-15 it is 0-15, but most often it is the case that for the range from 0 to 100, e.g. %, the actual values from 0 to 255 correspond. Therefore, sometimes the displayed values may differ e.g. by 1. This may result from different roundings in the conversion of different ranges, e.g. 0-255 to 0-100 and vice versa. It is the same value, but interpreted and calculated differently.


