
🖧 Telnet Clusters
⚙️ Configuration
In the configuration window, select the Clusters / Telnet tab:

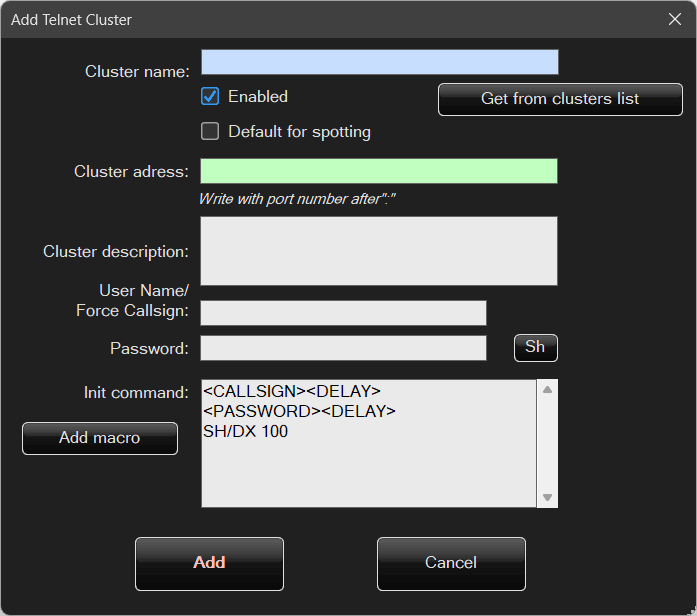
The program supports up to 10 clusters.
On the left side, there is a list where you can add, remove, or edit Telnet clusters.
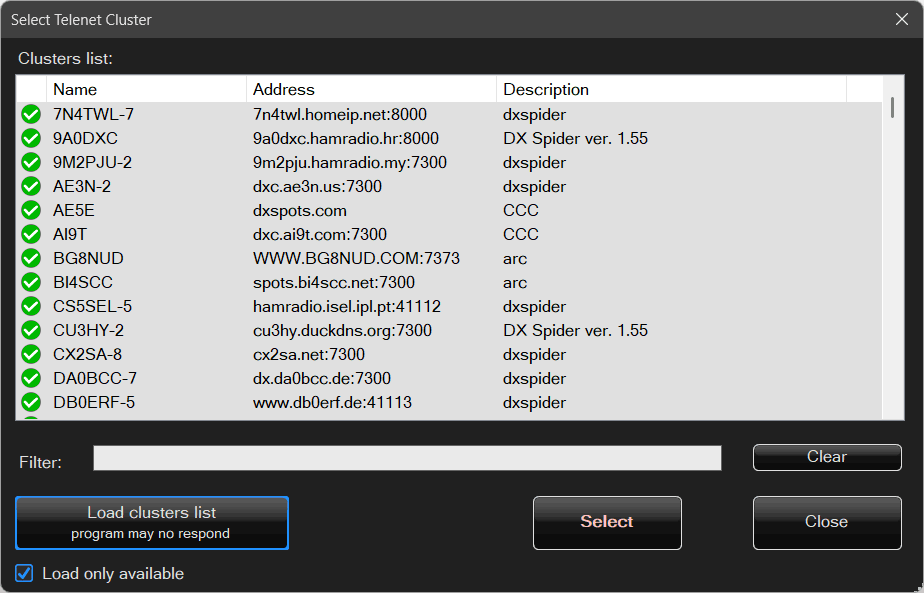
A cluster can be selected from the cluster list by clicking Get from cluster list:
Most clusters require you to provide your callsign for login.
Additionally, if you want to send spots, the cluster usually requires user registration and a password.
For receiving spots, registration and password login are typically not required.
Among all added clusters, only one can be set as the default cluster.
When you send a spot, it will be sent only to this default cluster.
Faster auto-refresh – for clusters, automatic refresh is enabled at twice the normal speed.
Global refresh settings are configured in the Scheduler section.
Keep connection alive – a highly recommended option.
The connection to the cluster will not be closed. Some clusters do not tolerate frequent connections and disconnections and may block the user.
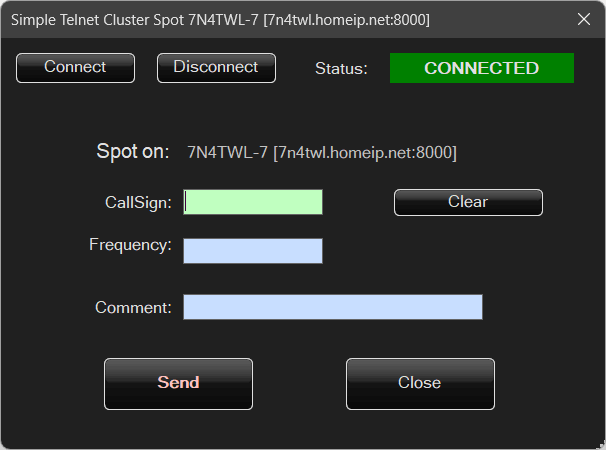
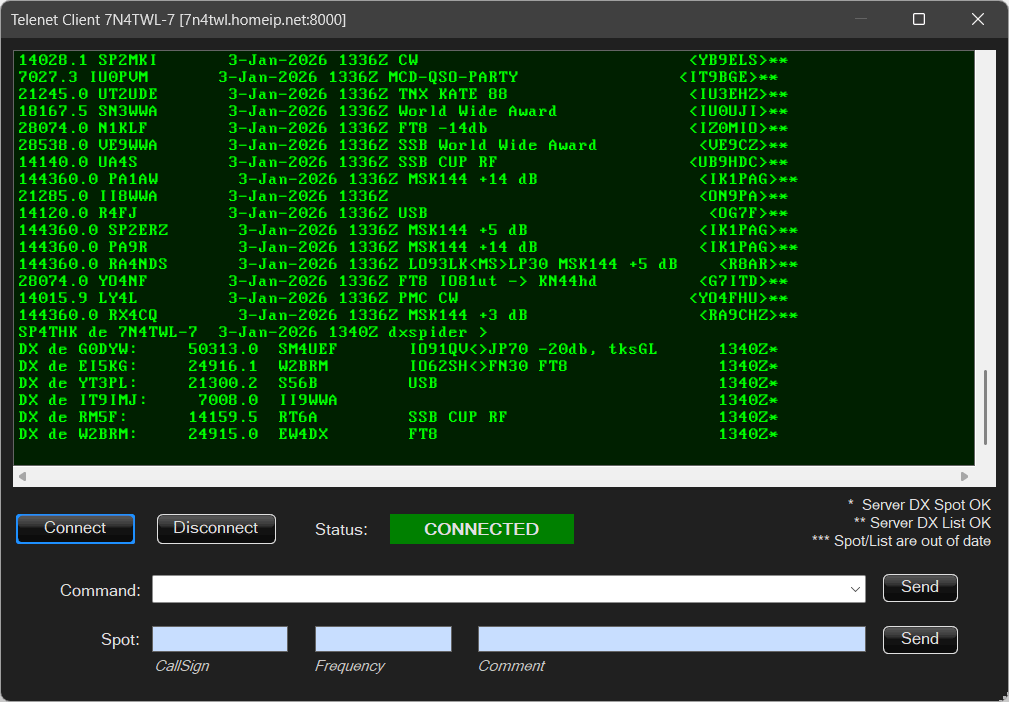
Basic spot mode and Advanced spot mode with Telnet window
When you want to send a spot to a cluster, you have two options.
The first is a simple spot window, where you enter the data and send the spot:
Advanced spot mode simply opens the full Telnet console window.
It is recommended to keep the Basic spot mode option enabled.
Spot merging options
If multiple clusters are configured, the same data may appear more than once.
The program can attempt to merge identical or similar spots into a single entry.
There are four available options defining how spots should be merged:
- Do not merge spots
- Merge spots by Callsign only
- Merge spots by Callsign and Frequency (±2 kHz)
- Merge spots by Callsign, Frequency (±2 kHz), and Spotter
Stay on first row after refresh
If this option is disabled and you click a selected spot in the Logbook list, the program will remember the selected position and, after refreshing cluster data, return to the same place (if possible).
If this option is enabled, each refresh will move the view back to the top of the list.
Try to detect mode from comment or frequency
Clusters do not provide explicit information about the operating mode — typically only the frequency and callsign are available.
The actual mode (CW, SSB, FT8, etc.) is therefore unknown. No logging program — even the best one — can know it for sure, but it can try to infer it 🙂
Spotters often include mode information in the comments.
The program can attempt to extract the mode from these comments.
If that fails, it will try to guess the mode based on frequency, using a simplified band plan (for example, 7074 kHz is most likely FT8).
Of course, this approach may occasionally result in incorrect assumptions.
📡 Working with clusters in the Logbook
In the main Logbook window, there is a selector for My Logbook, followed by POTA, SOTA, and other clusters.
At the very end, there is the Telnet Clusters option.
After selecting it, an indicator light will appear next to it.
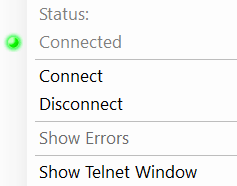
The indicator can have the following colors:
- Yellow – connection in progress
- Green – connected and operating correctly
- Red – an error has occurred
Clicking on this indicator light will display a menu:
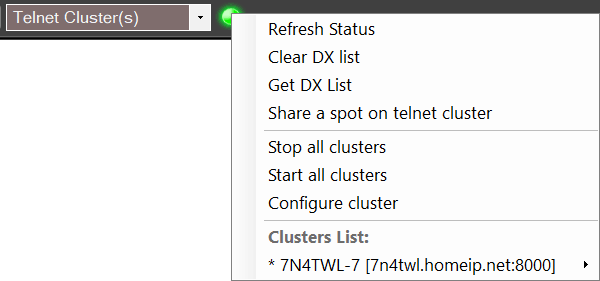
Additionally, each cluster in the list at the bottom has its own submenu:
📡 Cluster spots
How to create a spot? There are several ways:
- By clicking the green indicator light
- By selecting the option from the Menu
- By right-clicking on the cluster spot list and choosing the option from the context menu
Depending on the context, the program will automatically suggest who the spot should be created for by default.
When right-clicking on the log list, the callsign is taken from the clicked record (not the one highlighted in blue).
When selecting the option from the Menu, the program first checks whether the Callsign field is filled — if so, that callsign will be used by default instead of one from the list.

When clicking the green indicator light, if the Callsign field is filled, you will have two options for that callsign and one empty option to choose from.
Of course, after opening the spot window, all values can be freely modified.
📡 WSJT-X / JTDX integration
Applications such as WSJT-X and JTDX support digital modes, for example FT8.
They can automatically send data to logging programs like this Logbook, allowing QSOs to be saved automatically.
Configuration is simple.
Open the configuration window and select the WSJTX / NTP tab.
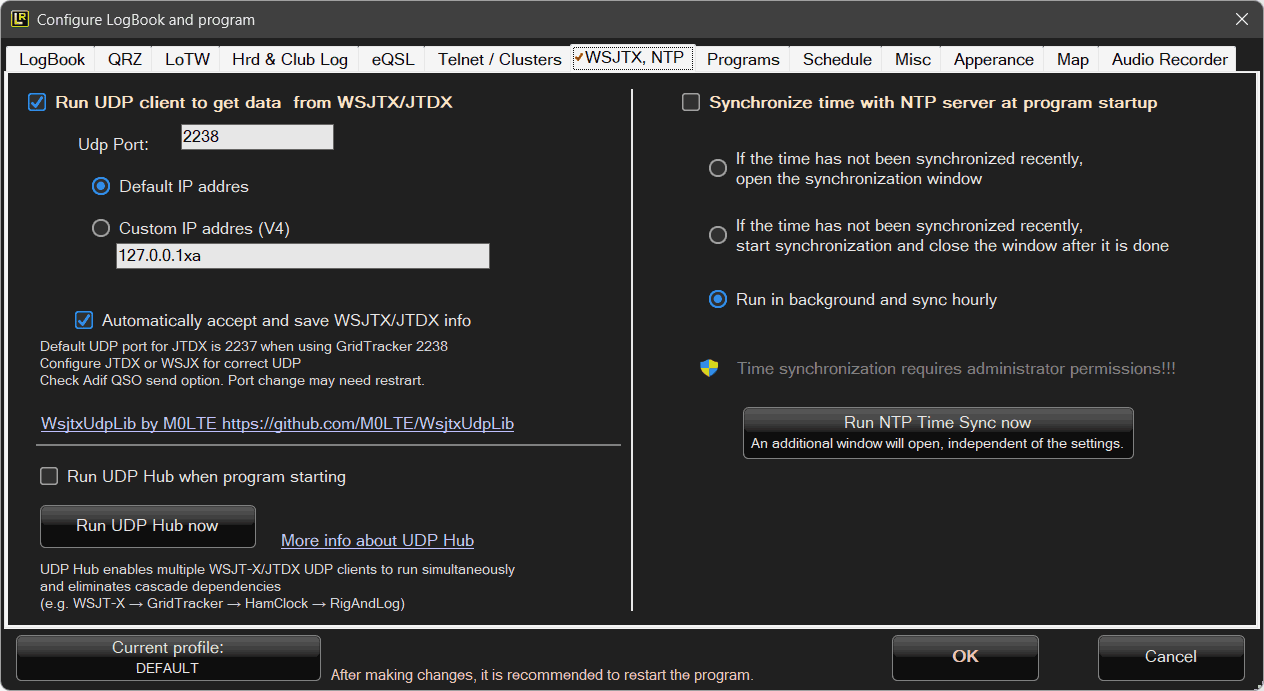
Here you configure the UDP port, IP address, and whether incoming data from WSJT-X / JTDX should be accepted automatically.
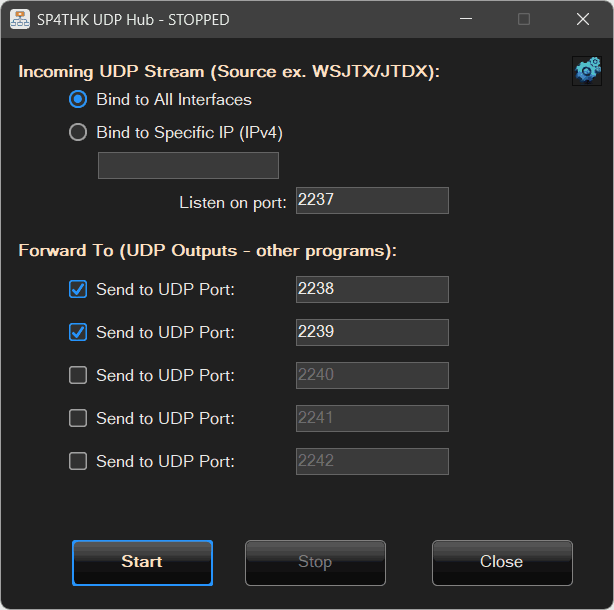
UDP Hub
UDP Hub is a unique feature that launches a separate application running in the Windows system tray.
Its purpose is to distribute data sent to a single UDP port (e.g., from WSJT-X/JTDX) to multiple independent programs.
How does it work in the standard setup?
WSJT-X sends its data via a UDP port.
By default, this data can be received by only one application.
Although a multicast option (sending data to multiple recipients) is available in the settings, under Windows this feature often does not work reliably or can be difficult to configure.
If we want to use multiple applications at the same time, such as:
- GridTracker
- HamClock
- RigAndLog
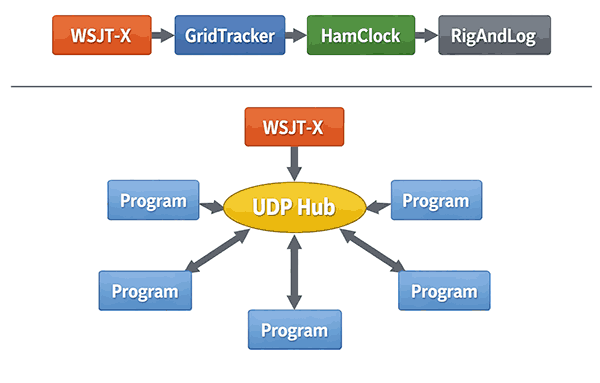
a so-called dependency chain is created:
WSJT-X → GridTracker → HamClock → RigAndLog
Each program receives the data and forwards it to the next UDP port in the chain.
Problems with the Standard Chain Solution
Such a dependency chain has several significant drawbacks:
- It requires all programs to be started in a specific order.
- The configuration is rigid and not very flexible.
- If any single component crashes or is closed, the entire chain stops working.
- Not every application supports forwarding data to another UDP port (UDP forwarding).
Solution – UDP Hub
UDP Hub eliminates the dependency chain.
It works in a simple and reliable way:
- It listens on a single UDP port (e.g., the one configured in WSJT-X).
- It receives the data.
- It distributes the data in parallel to multiple additional UDP ports (e.g., 5 ports).
- Each program connects directly to UDP Hub instead of another application.
As a result, we get a star topology architecture instead of an unstable linear chain.
The difference between these two approaches is illustrated in the diagram below.
Advantages of UDP Hub
- The program runs in the system tray and does not interfere with normal operation.
- No dependency chain.
- All connected applications work independently.
- Improved overall system stability.
- Simpler configuration and support for multiple clients (up to 5).
After launching, the program displays a single, simple configuration window.
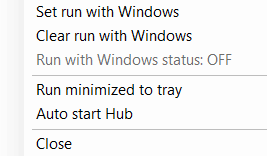
We can also click the Advanced Configuration button.
A simple menu will appear, allowing you to configure how the program should start.
⌚ Time synchronization with an NTP server at program startup
Having a properly synchronized system clock is quite important when logging QSOs.
Accurate time becomes critical for digital modes, where an incorrect clock may prevent successful decoding and, as a result, make communication impossible.
The program includes a separate module responsible for time synchronization.
On Windows, synchronizing the system time requires the program to be run with administrator privileges or as a system service.
A simple solution is used here — a separate utility called SET_NTP_TIME.exe is launched, and the user must confirm its execution with administrator permissions.

📅 Scheduler
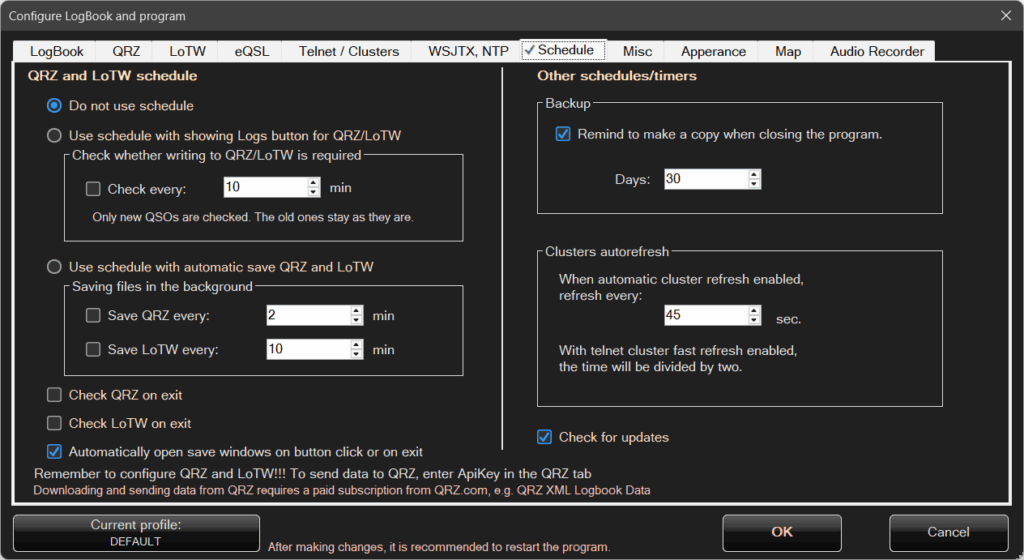
On the left side, there are three main options related to QRZ and LoTW:
Do not use Scheduler
Use Scheduler with QRZ/LoTW log button visible
The program will periodically check whether there is anything to upload to QRZ or LoTW.
When new QSOs are detected, a button will appear on the bottom status bar of the program.
Clicking this button will open the upload window or display a selection menu.
The program will not send anything automatically in the background.
Use Scheduler with automatic upload to QRZ and LoTW
With this option enabled, the program will automatically upload data to QRZ and LoTW in the background at specified intervals.
Two additional options at the end are:
Check QRZ on exit and Check LoTW on exit
Regardless of whether checks were performed earlier or scheduled intervals are configured, the program can check on exit whether there is anything that still needs to be uploaded.
Automatically open upload windows
By default, when closing the program or pressing the upload button, a selection menu may appear.
When this option is enabled, the selection menu is skipped and the program will open the QRZ and LoTW upload windows sequentially.