
The default program window is the transceiver control window:
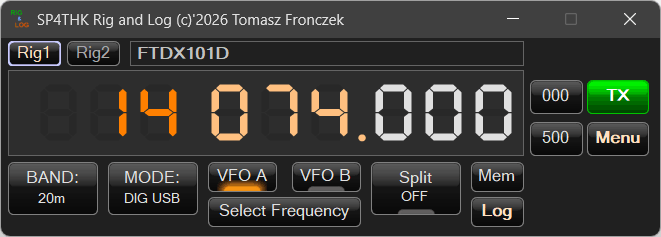
It retrieves information about the current parameters of the device via omnirig.
To open the Menu, in addition to clicking with the mouse, press F10 or the left ALT key.
Help is displayed after pressing F1.
This is an online help system and requires an active internet connection.
F2 will take you to the top of the button list (the BAND option will be selected for the blind)
At the top is the name of the selected RIG from omnirig. Below is the radio frequency.
It can be controlled in several ways.
MOUSE:
1) Scroll the mouse to the appropriate number.
2) left mouse button plus and right mouse button minus. This method can be changed in the Menu settings: Interface settings. Select the Left mouse button +/- option if you clicked on the upper or lower part of the number. Then the left mouse button clicked at the top of the number increases the value and decreases it at the bottom. The right key does not change its operation.
KEYBOARD:
1) PLUS, MINUS – changes the frequency by 1000 Hz (1kHz)
2) CTRL +, – and arrows – changes the frequency by 1000 Hz (1kHz)
3) CTRL SHIFT +, – and arrows – changes the frequency by 100 Hz
4) ALT +, – and arrows – changes the frequency by 10 Hz
5) ALT SHIFT +, – and arrows – changes the frequency by 1 Hz
6) ALT CTRL +, – and arrows – changes the frequency by 100000 Hz (100kHz)
7) ALT CTRL +, – and arrows – changes the frequency by 10000 Hz (10kHz)
In blind mode, which is invoked either by the AutoBlindMode.bat file, an option from the Blind Mode menu, or by the ALT CTRL Ø(zero) keyboard shortcut, the mouse control mode is unavailable. Additionally, instead of digits in the seven-segment LED format, there will be a button with a frequency enabling access to reading the value by screen readers. By clicking on it (Enter) the frequency setting window will open.
When using frequency abbreviations in blind mode, you will automatically go to this button (it will be checked).
The 000 and 500 buttons equalize the frequency to .000 and .500 kHz.
In blind mode they are invisible, but keyboard shortcuts work for them.
These are CTRL – Ø and CTRL – 5 respectively
Additionally, you can set the frequency from the keyboard by pressing the (CTRL-F) button. If the frequency has not yet been downloaded from Omnirig/Hamlib, a short sound will be played instead of the window. You should then wait a while.
TRX Configuration
After selecting this option from the menu, the following window will be displayed:
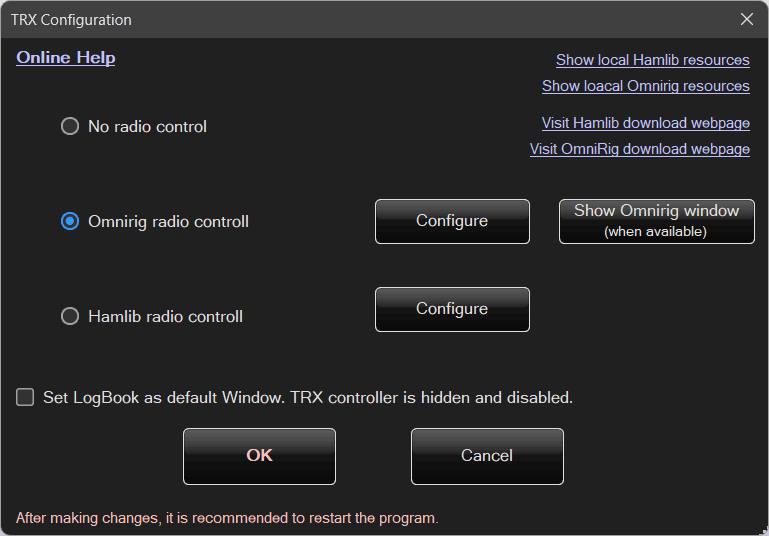
OmniRig
When selecting radio control via OmniRig, you can click Show OmniRig window (if available).
If this window is not visible, make sure that OmniRig control is selected, close this dialog, and open the configuration again.
If OmniRig was not previously selected, its libraries are not initialized and there is nothing to display.
All configuration parameters are set in the OmniRig application window:
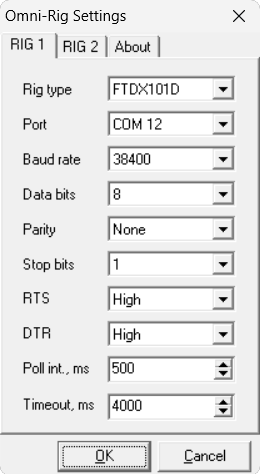
OmniRig can control two radios simultaneously, which are configured separately as RIG1 and RIG2.
In the program directory, inside the OmniRig folder, there are additional .ini files for selected transceiver models, containing slightly adjusted control parameters.
After starting the program with OmniRig selected, you can choose which radio to use — RIG1 or RIG2.
This can be done either from the menu or by using keyboard shortcuts:
- CTRL + F1 – selects RIG1 from the OmniRig configuration
- CTRL + F2 – selects RIG2 from the OmniRig configuration
- CTRL + F3 – opens the OmniRig dialog window
(sometimes required, for example, to restart OmniRig)

In some cases, OmniRig may stop responding. This can happen, for example, when turning devices on or off, or when an incorrect radio model is selected (e.g. sending ICOM commands to a Yaesu transceiver).
In such situations, OmniRig needs to be restarted.
Simply reopen the OmniRig window.
Hamlib
In this case, the configuration is much more advanced.
First, it is important to explain how the Hamlib libraries are structured.
Hamlib communicates with the radio using one of its modules — in our case, rigctld.exe.
This program is responsible for establishing and maintaining the connection with the transceiver.
Applications that want to access the radio simultaneously — possibly from multiple locations — connect to the Hamlib module via the TCP/IP protocol (network).
This may be the same computer, a different computer on the local network, or even a remote location.
Due to this design, Hamlib operates in a client–server architecture.
- The client is an application such as Rig And Log, WSJT-X, JTDX, etc.
- The server is the Hamlib component
rigctld.exe.
Hamlib libraries do not provide any graphical interface for startup or configuration.
Most radio applications implement their own communication interface for Hamlib.
Hamlib also cannot start itself automatically or install itself as a system service (for example, to start together with Windows).
For this reason, most applications start rigctld.exe together with their own startup and shut it down when the application exits.
This approach causes problems when you want to run more than one application at the same time.
In such cases, you must either:
- configure the second application as a client of the first one and run both together, or
- start a separate Hamlib server inside the second application.
In the latter case, both applications cannot be run simultaneously, because only one Hamlib server can control a given radio at a time.
This limitation has been solved in a simple and effective way.
All radio applications on the computer act only as clients.
They are configured to connect to one shared Hamlib server.
Each application can be started independently and can run alone or together with others.
This is the most flexible solution.
So who acts as the server in this case?
Rest assured — it is not Rig And Log itself.
A dedicated standalone module called HamlibStarter.exe has been developed.
This module is responsible for:
- configuring the Hamlib server
- starting and stopping
rigctld.exe - monitoring the server state
- automatically restarting the server if it crashes or stops unexpectedly
Step by step…
In Rig And Log, start the Hamlib configuration.
Hamlib Client
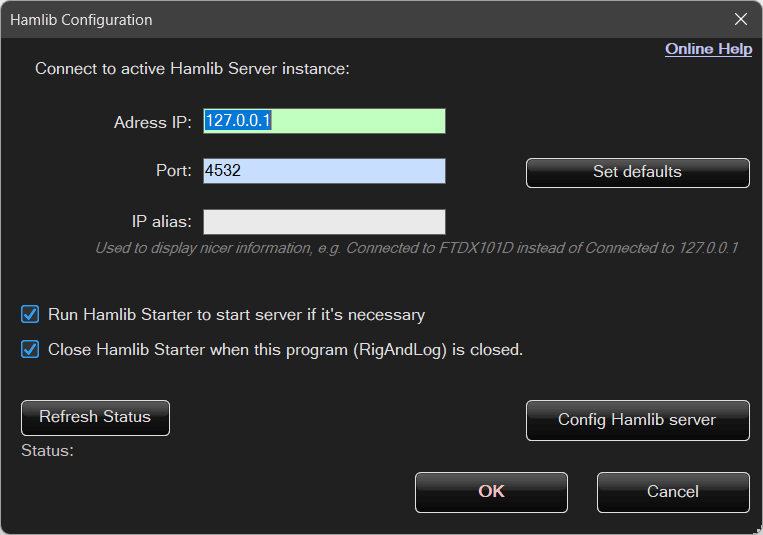
In practice, only two options are essential: the server IP address and the port.
The Alias field is optional and can be used to display more user-friendly descriptions.
For example, instead of:
Connecting to 127.0.0.1…
the program can display:
Connecting to FTDX101D…
or
Connecting to MY SUPER RADIO…
That is essentially all that is required to configure the Hamlib client.
Hamlib Server (HamlibStarter.exe)
The situation becomes more complex on the server side.
Rig And Log can connect to any Hamlib server, as long as it is a network-enabled version that allows connections via TCP/IP.
At the same time, the program can also start and use its own Hamlib server.
By clicking Configure Server, a separate application called HamlibStarter.exe is launched.
As mentioned earlier, this is an independent module.
It can also be used with other programs, started manually, or configured to start automatically with Windows — offering full automation and flexible configuration.
After launching it, the following window will be displayed:

The program starts in the system tray (next to the clock) and, depending on its configuration, may remain hidden in the notification area.
In the notification area, the tray icon can display three different states:
 The program is starting
The application is initializing and checking all components. The server will start shortly.
 Hamlib (
rigctld.exe) is running
The Hamlib server is started and operating correctly.
 An error occurred while starting Hamlib
The rigctld.exe process is not present in memory.
Warning!
HamlibStarter does not validate Hamlib parameters such as port numbers or other communication settings.
It only checks whether the server process is present in memory.
Ensuring correct configuration is entirely the user’s responsibility.
To configure the Hamlib startup parameters and the program itself, open the menu and select Configuration.
Server Configuration
After selecting this option, the following configuration window will appear:
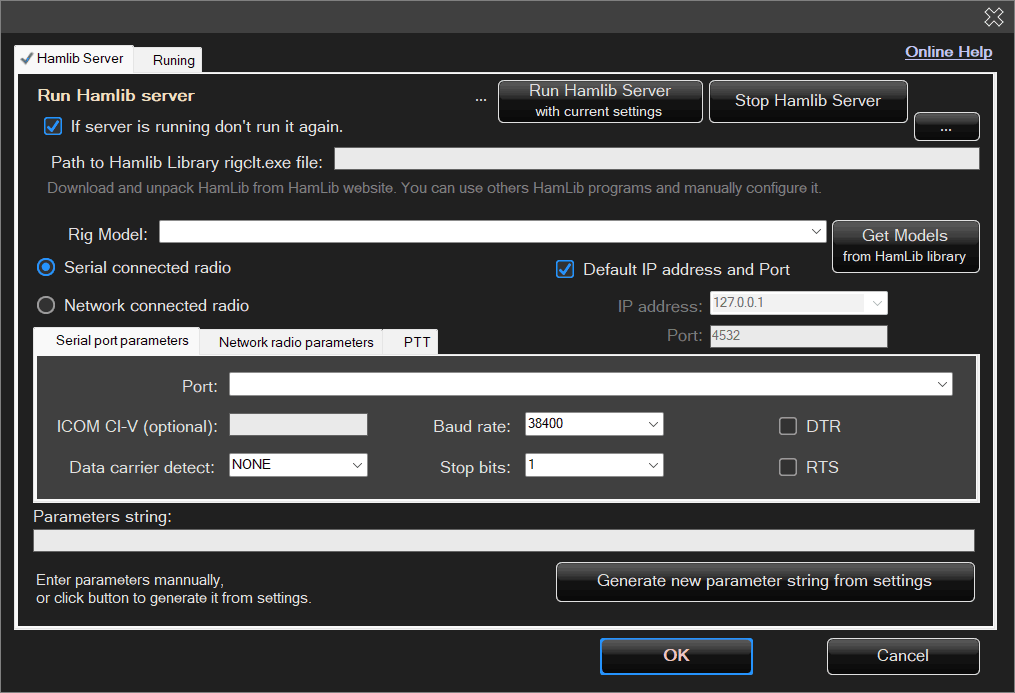
Here you select the location of the Hamlib libraries and the startup (configuration) options for rigctld.exe.
These parameters define which radio rigctld.exe will communicate with and how this communication is performed.
In most cases, the radio will be connected via a serial port.
For PTT settings, the CAT option is usually used, without specifying a separate port.
After setting all options, the parameter string can be generated automatically.
However, if you prefer a custom configuration, the parameters can also be entered manually.
Warning!
Hamlib supports operation in VFO mode, but this mode is not supported by Rig And Log.
VFO mode is a simplified control mode in which Hamlib only returns and sets the current frequency.
This mode is of limited usefulness for most applications, and Rig And Log will not work with this configuration.
HamlibStarter Startup Configuration
This is the second tab of the configuration dialog:
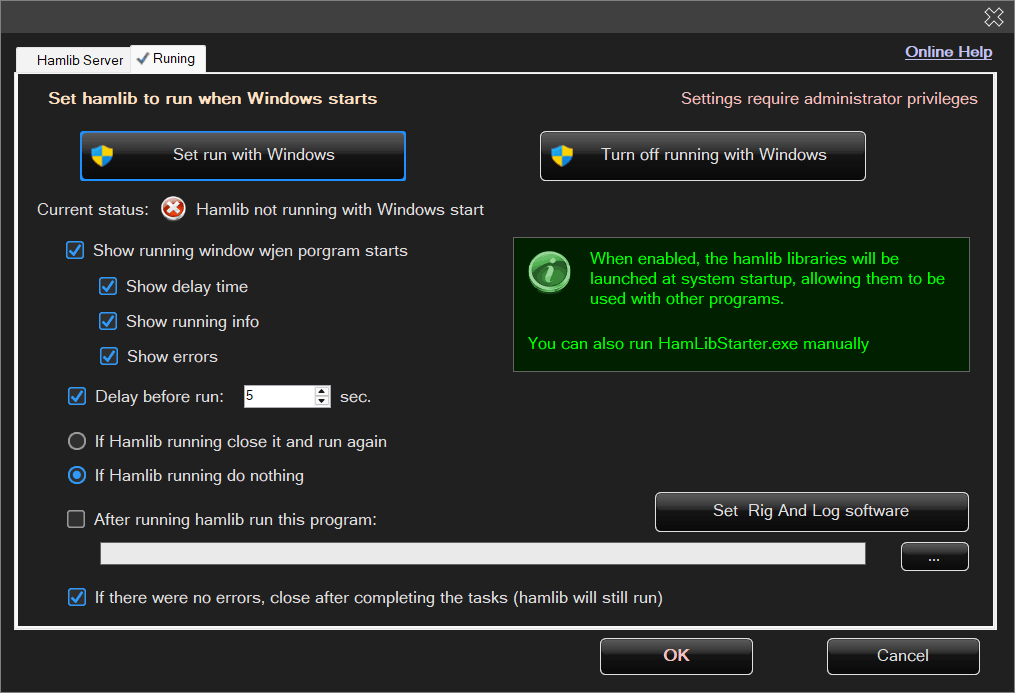
In this tab, you can configure the program to start automatically with Windows and define its behavior after startup.
You can choose whether the application should display its window and under what conditions — for example, always or only in case of errors.
After everything is started, it is also possible to launch an additional application, such as Rig And Log.