The second main module of the program, and in many cases the first one, is the LogBook, which allows you to record communications. It may or may not work in conjunction with a transceiver.
You can also set it as the main program window if you want to use only logs without connecting to the radio.
The idea behind the creation of the log was field activations in various programs. For now, I have experience with the POTA program, so other programs may still require testing and corrections.
Log does not need databases, the files are saved in text form in the CSV format and can be easily opened in Excel, for example.
This is a simple and quick way to save data that does not require filtering or various types of queries. It is good practice to save each activation in a separate log created for a specific activation. This protects against failure and speeds up the program’s operation.
We run the logbook from Menu->Log Book with the POTA/SOTA cluster….
Other startup and configuration methods are described in the Installation section.
You can easily move between the necessary fields, i.e. sign, reports, frequency, etc., using the Tab or Enter key.
Required fields are highlighted in “blue”
The program marks required fields in “red” if they are not completed.
When working with a cluster, clicking on a cluster element will fill the fields with data from the cluster. We start a conversation (if we succeed). We press enter several times to accept, correct the RST reports if necessary, and the log is saved. You can also immediately click on Save to logbook. If the date is empty, it will be filled in automatically.
When not saving, click on another record in the cluster or the Clr button. – data cleaner. There are two Clr buttons. At the sign, he cleans as much as he can. For a band, it only clears the frequency, band and mode.
LogBook main window:
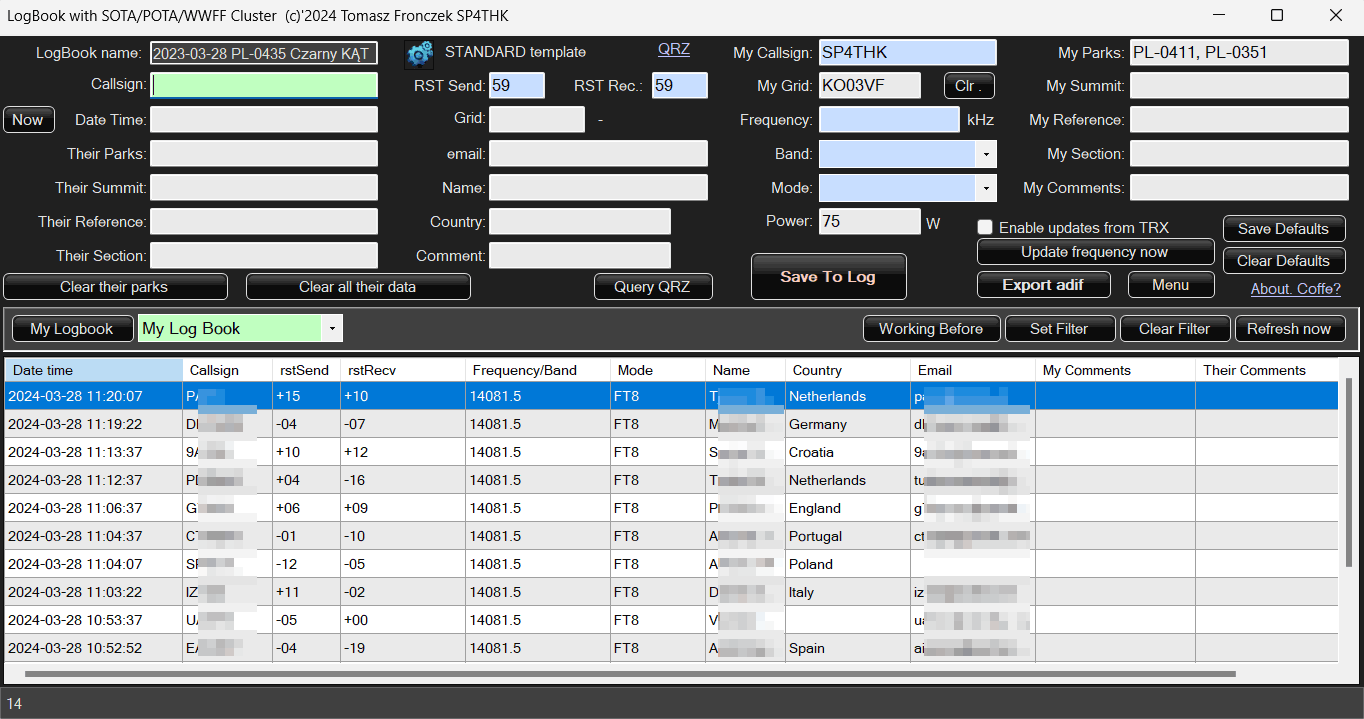
At first, the multitude of options may be overwhelming, but after a while everything will become clear.
I suggest you set the configuration first. To do this, click on the Settings icon:

A window with options will appear:
1. Logbook
The options are intuitive.
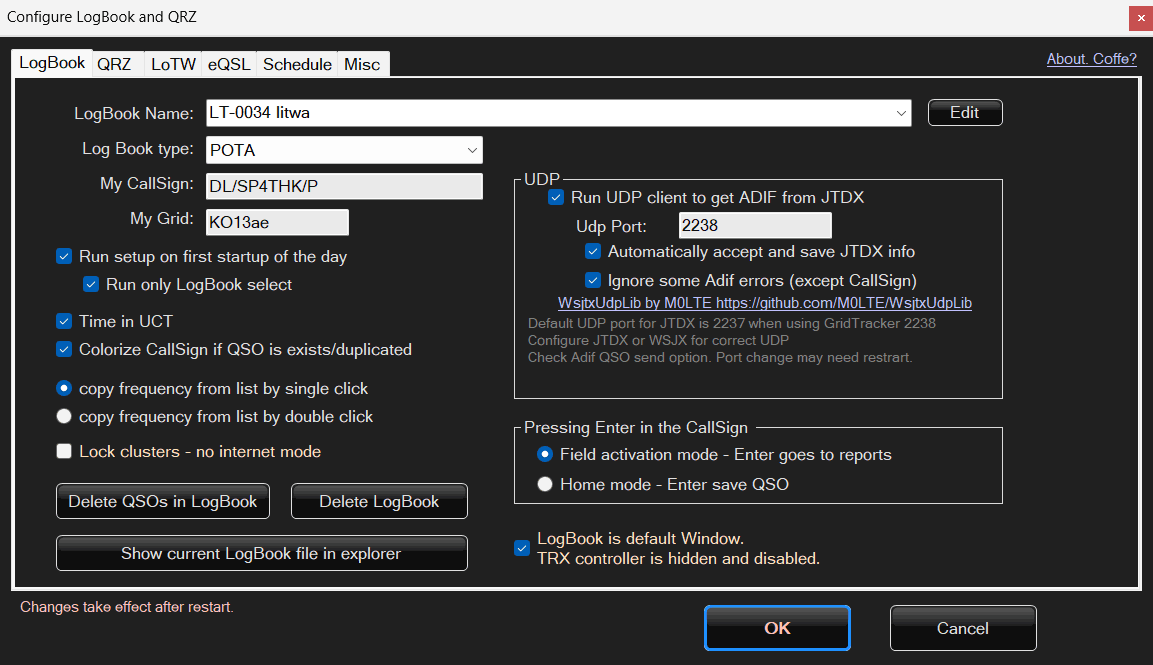
Logbooks are saved in the LOGBOOKS folder of the program. Each log is a separate folder with its name. Therefore, special characters such as: ?&% \/ etc. cannot be used in the name. The folder with the name contains the file logbook.csv and its copies (11 recent changes other than adding another QSO).
The LogBook configuration is divided into sections:
- LogBook – Logbook name and template, user data, behavior, cooperation with JTDX, etc
- QRZ – login data to QRZ, how the program cooperates with QRZ
- LoTW – data for cooperation with the TQSL program from LoTW
- eQSL – configuration of sending QSL cards via email.
- Schedule – schedule settings, i.e. checking whether there is data to be sent to QRZ and LoTW
- Misc – other program options such as language, copies.
Most configurations are intuitive. I will describe the Schedule here.
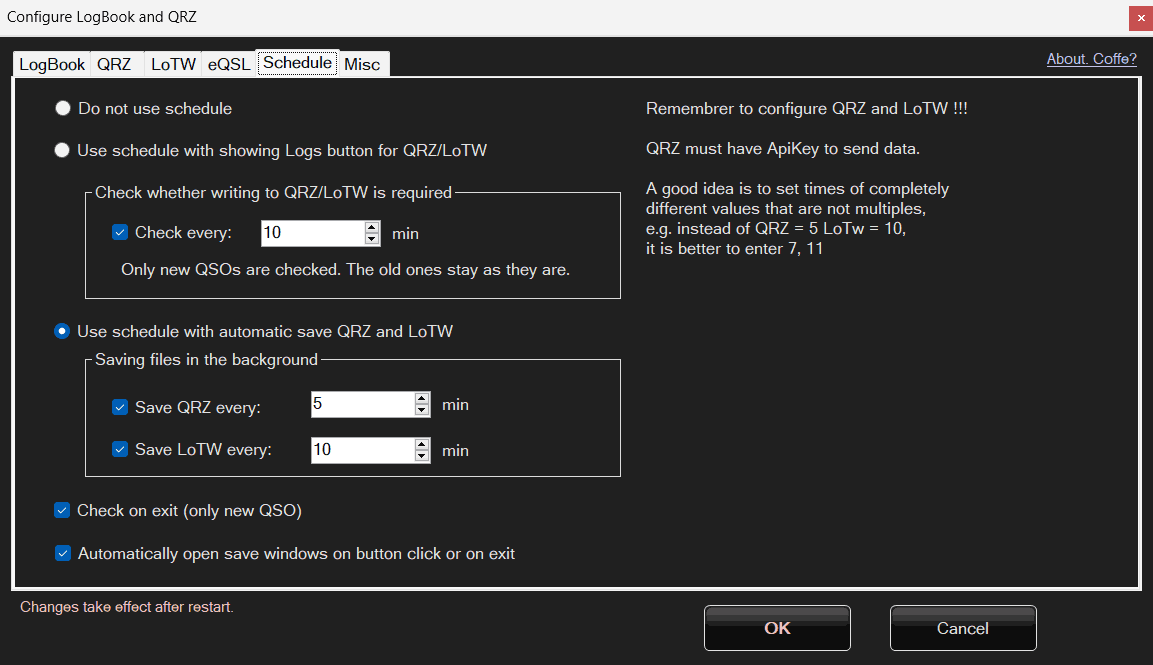
There are three main options here
- Don’t use Schedule
- Use schedule showing Logs button for QRZ/LoTW. The program will check every specified time whether there is anything to write to QRZ or LoTW. When there are new QSOs, a button will appear on the bottom bar of the program. Clicking on it will show the save window or a menu to choose from. The program itself will not send anything in the background.
- Use a schedule with auto-save QRZ and LoTW. With this option, the program will save information to QRZ and LoTW in the background at specified times.
The additional two options at the end are:
- Check when closing the program (actually the logbook module) Regardless of whether it was checked or not and whether checking times are set. When closing the log window, the program can check whether something has been sent.
- Automatically open save windows. When you close the program or press the save button, a menu with selection options may appear by default. When you select this option, a menu will not appear with the selection of the windows for recording to QRZ and LoTW
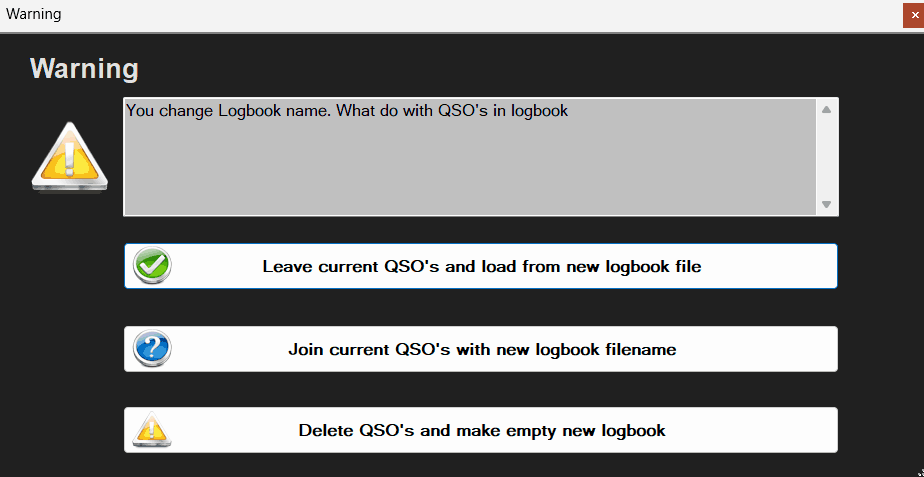
Changing the logbook.
There may be a situation where we have a logbook and open another one.
What to do with existing records? Save, abandon? And it can be attached to the opened log. When changing the folder/log name, after clicking OK, the program will ask:
Next, select a template, character, grid, etc. The template is only information for the program which fields to check and require. The full record is always saved.
Logbook can retrieve data from JTDX or WSJTX. After appropriate configuration, also with the Grid Tracker program running. This allows you to save digital transmission logs, e.g. FT8, directly in the program. The program may require acceptance and manual clicking on the Save to Logbook button, or it will do it itself after selecting Automatically accept data from JTDX.
However, this data does not contain information about parks, etc. If we have previously entered it in the fields of the LogBook window, it will be added, if not, the program will detect an error and will not save the record. Selecting ignore some adif errors will allow you to save the record even without some required fields – they can be quickly filled in later.
The digital broadcast program should be properly configured.
If it is to work together with our radio support (Rig module), it must also connect to the transceiver via omnirig.
You should also select (JTDX or WSJTX) the option to send Adif logs via the UDP port and the correctness of the selected ports.
When something doesn’t work with automatic download? You can also safely import this data later from the logs of these programs.
2. Data from QRZ
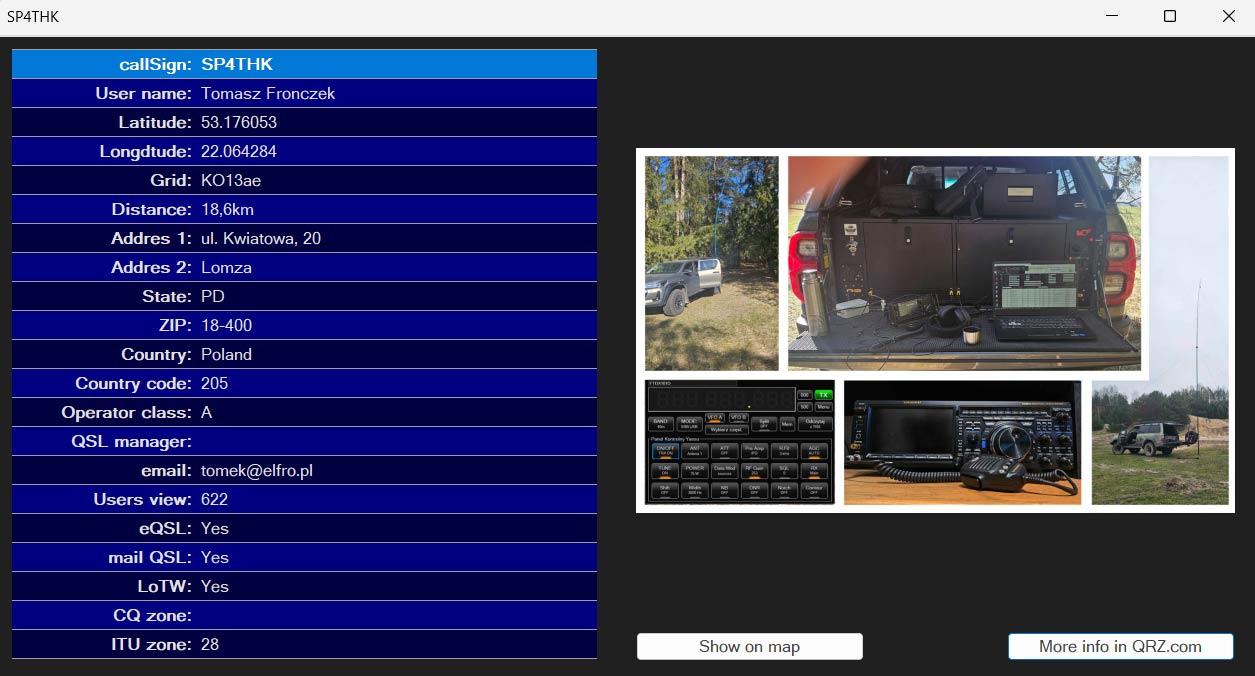
The program can download additional information from QRZ and fill the fields with it. This can be done manually or automatically. It can also do it in two scopes. Without logging in, only basic information and after entering your password – all data from QRZ. However, only the necessary data such as name, email and country are copied to the log. Extended data from the last download can be seen by clicking More from QRZ in the log window.
Additionally, we can enter our API Key. This is a paid option at QRZ. Thanks to this, the program will be able to send the QSO list from LogBook to the QRZ server.
When downloading data from QRZ, the program can also display additional information such as the user’s profile photo from QRZ. You can also view all user data downloaded from QRZ.
After configuration, we return to the main window. Its upper part is the current data that we will save. There are a lot of fields, but only some are required. This depends on the type of program selected (POTA,SOTA etc.) The required fields are highlighted.
So why don’t unnecessary fields hide and simplify the appearance?
Thanks to this, you can combine programs, e.g. POTA and SOTA – just fill in more fields!!!
Closing the configuration dialog
Logbook
After entering your data in the My… fields and adding the first log, they will be saved as default data for subsequent connections. However, if we have not added any QSO, we can save the entered data by clicking Save defaults, or delete them by pressing the Clear defaults button
Clear data of their parks – deletes data about our correspondent’s parks etc.
after selecting the Clear data after saving option, this will be done automatically.
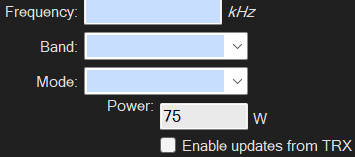
If the log works with the radio, you can also update the frequencies directly from the radio
The bottom part of the log window is a list. It can display various data.
list of saved My LogBook connections, and data from POTA, SOTA, WWFF and DX clusters
We further divide the POTA cluster into SPOTS and ACTIVATIONS
SOTA cluster on SPOTS and ALERTS
You can turn off the filter by entering a fragment of the region you are interested in, e.g. SP. the filter distinguishes between lowercase and uppercase letters. It searches selected fields depending on the selected display type, logbook or cluster, and checks whether there is a fragment of text there, e.g. the words SP4THK SPAIN, WYSPA, SP-1234 and anything that contains the entered SP.
Attention! The program distinguishes upper and lower case letters in some search fields. SP, sp, Sp, sP are different queries. The filtered list has a “red” background so that it is immediately visible in case of panic where other QSOs from the log have been lost ;P

By clicking on the data from any cluster, they will be automatically entered into the appropriate log fields at the top and, if we have the Rig module running, the frequency on the radio will also be set. A single or double click may be required depending on your configuration settings.

Unlike other programs, here one record is saved as one regardless of how much data is in a given connection, e.g. multi Park to multi park plus SOTA and WWFF, no problem. This will be one record. If you work from many parks or had contact with many parks, enter them after a comma. During export, the data will be properly processed, separated and duplicated, and divided into appropriate files.
Editing QSOs
After adding a QSO, it often turns out that something needs to be improved, e.g. we forgot about the grid
Just double-click on the selected record and the edit window will appear:
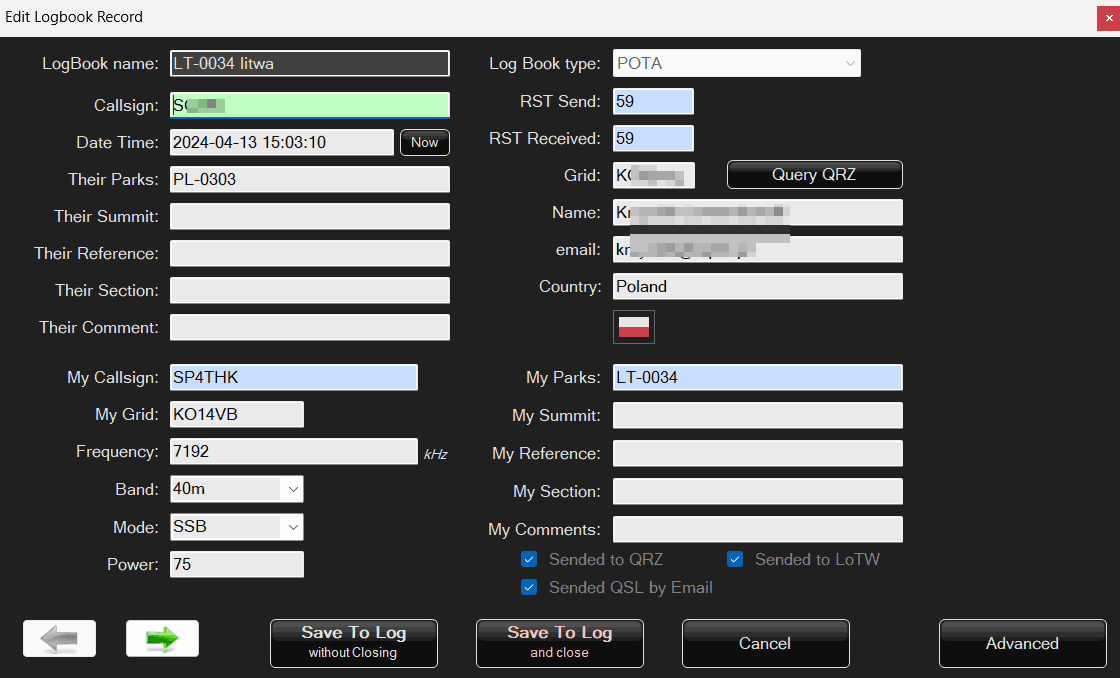
You can correct all record fields here. Use the arrows to go to the next/previous QSO.
Advanced.
What if you need to change all records in the log? For example, the park was entered incorrectly? Click on Advanced:
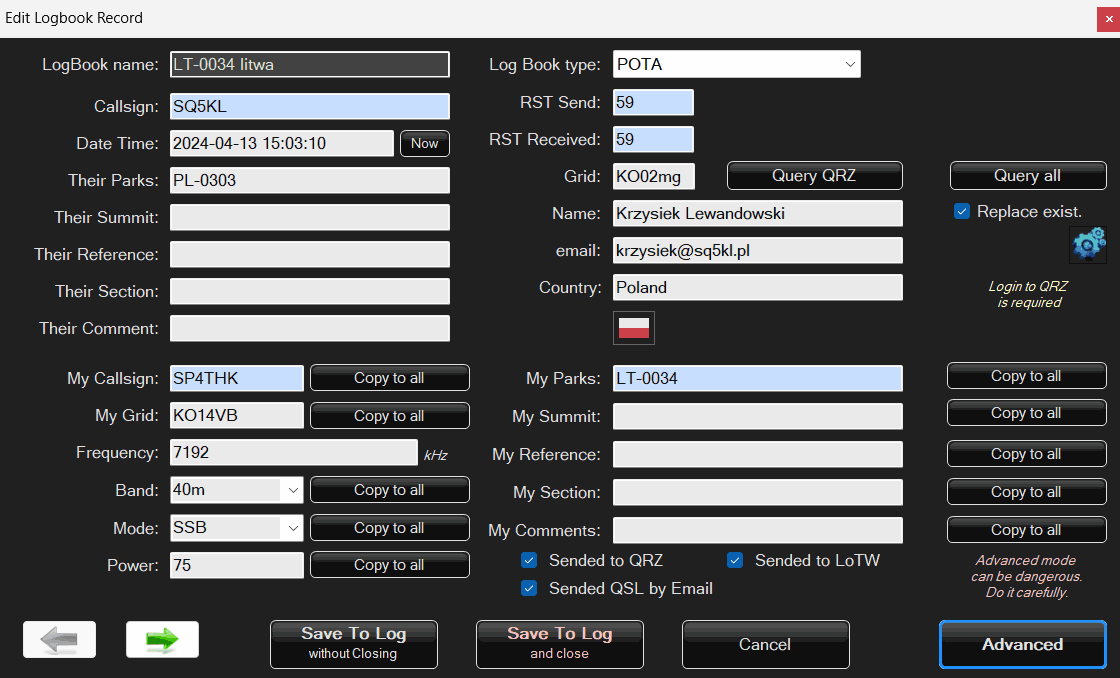
Using the appropriate buttons, we copy the value of the current field to all records (all other connections) in the log.
You can also submit a wholesale query to QRZ and complete the details of all connections with one click. This requires entering your QRZ login details in advance. You can click on settings to open the same settings window as in the main log window.

Be careful, the program does not check what was in the replaced fields.
A log backup is made – just in case.


