
🌐 QRZ
Before starting the configuration, it is important to explain the policy and operating rules of the QRZ service.
QRZ offers several account plans for its users: a free account and multiple paid subscription plans.
A detailed description of the available subscriptions can be found at:
https://shop.qrz.com/collections/subscriptions
For the user, the most important distinction is between a free account and a paid account.
With a free account, all interaction is performed directly through the QRZ website:
https://www.qrz.com
Data retrieved (in accordance with QRZ policies) by automated tools, loggers, and other software is very limited in this case.
Typically, it includes only:
- the callsign,
- the name,
- the address,
and essentially nothing more.
To obtain full user data, as well as to send and retrieve logs, a paid account is required.
At this point, someone may say:
“Wait, I have a free account, and another company’s logger retrieves full data.”
Yes — however, there are two possible explanations:
- the data is retrieved in the background by impersonating a user, a browser, and an open web page, which is not compliant with QRZ’s terms of service;
- large providers may have access to a private, proprietary API for communicating with QRZ, available exclusively to them.
We are a small project, and we do nothing beyond what is explicitly allowed by the QRZ rules.
This is why the distinction described above exists.
- Automatic data retrieval is always performed in accordance with QRZ policies.
If a user has a free account, only a limited amount of data will be available.
Unfortunately, this limitation cannot be bypassed. - The user may manually retrieve additional data from within the application.
To do this, click the QRZ button and select:
“Retrieve data from the QRZ website” (option available for free accounts). In this case:- a standard web browser window will open,
- the user must log in manually,
- if the login fields were previously filled, suggestions may appear,
- it is recommended to enable the “Remember” option, if available,
- after logging in, the page content will be retrieved, and a summary of the retrieved data will be displayed for confirmation.
Unfortunately, there is no other method to perform this operation correctly and in compliance with QRZ policies.
For user convenience, it is therefore recommended to consider purchasing a paid QRZ subscription.
After this brief introduction, we can proceed with the QRZ configuration.
⚙️ QRZ Configuration
To enable cooperation with QRZ, the service must first be configured:
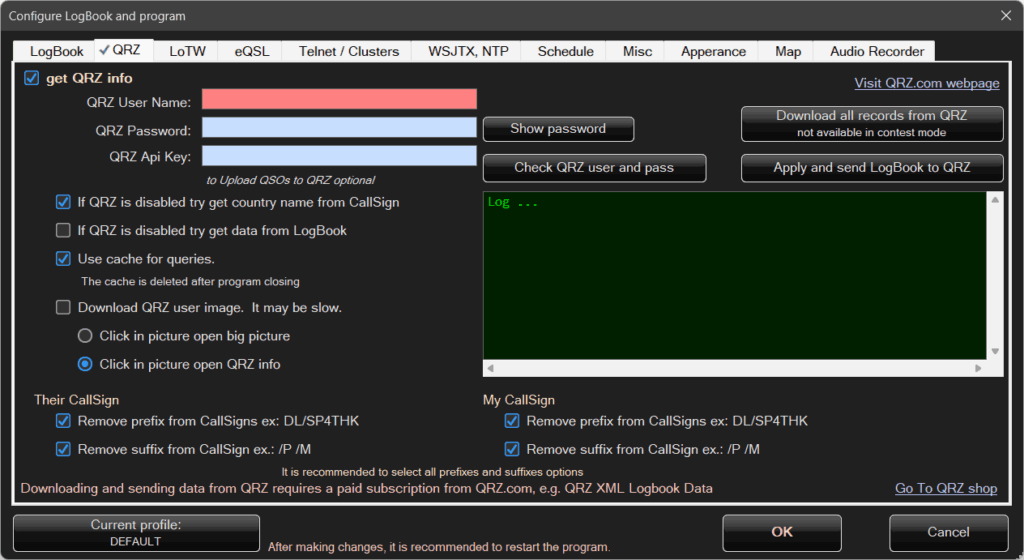
You must have a QRZ account and provide your password.
A free account does not provide access to many features, so unfortunately a paid account is recommended.
It allows retrieving full callsign information as well as uploading and downloading logs via applications, including Rig And Log.
QRZ distinguishes between prefixes and suffixes:SP4THK, DL/SP4THK, SP4THK/P, and DL/SP4THK/P are treated as different callsigns.
If a user has not added aliases (prefixes) in QRZ, QRZ will not recognize them.
The program cannot automatically query all variants with and without suffixes, as this would generate a very large number of requests.
For example, when manually entering SP4THK, several queries are already sent while typing: SP4T, SP4TH, SP4THK.
Adding prefixes would multiply the number of requests even further.
Additionally, different data may be returned — for example, some users create separate QRZ accounts for a callsign and a /P variant.
For these reasons, options are provided to strip prefixes and suffixes, both from the correspondent’s callsign and from your own callsign.
It is recommended to enable these options.
You can also enter your API Key.
This is a paid QRZ option and allows the program to upload and download QSO lists between the Logbook and the QRZ server.
When QRZ is properly configured, the main Logbook screen provides two buttons:
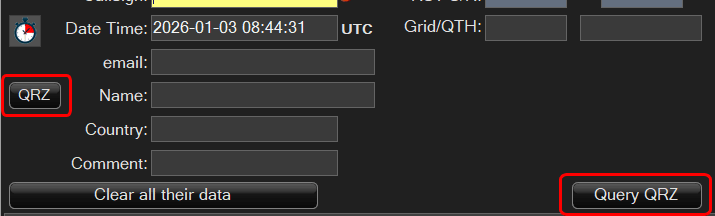
The Get from QRZ button is intuitive — it retrieves data from QRZ.
After clicking the QRZ button, a menu will appear:

To enable automatic QRZ lookups while entering a callsign, select the Auto Info from QRZ option.
From that moment on, data will be fetched from QRZ automatically as the callsign is typed.
Note: Entering a single callsign generates multiple queries.
While typing, the program does not know when the callsign entry is finished, so once a partial callsign appears valid (for example SP4T), a query is sent immediately.
As a result, for SP4THK, queries are sent for SP4T, SP4TH, and finally SP4THK.
This increases the number of requests but provides a more convenient user experience.
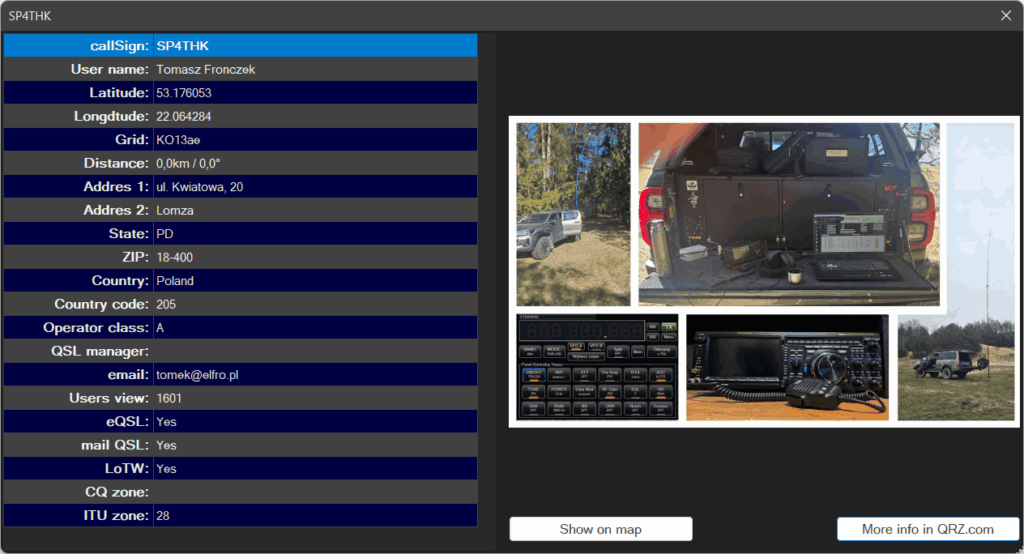
ℹ️ QRZ Information
When retrieving data from QRZ, the program can also display additional information, such as the user’s QRZ profile photo.
It is also possible to view all data retrieved from QRZ.
Click the QRZ button and select More QRZ Information:
Exporting (sending) logs to QRZ
The program allows you to export saved logbooks directly to the QRZ.com database.
To make this possible, the user must have an active QRZ subscription and generate an API key on the QRZ website.
The API key must be entered in the Logbook configuration.
After clicking Send Logbook to QRZ, the following window will appear:
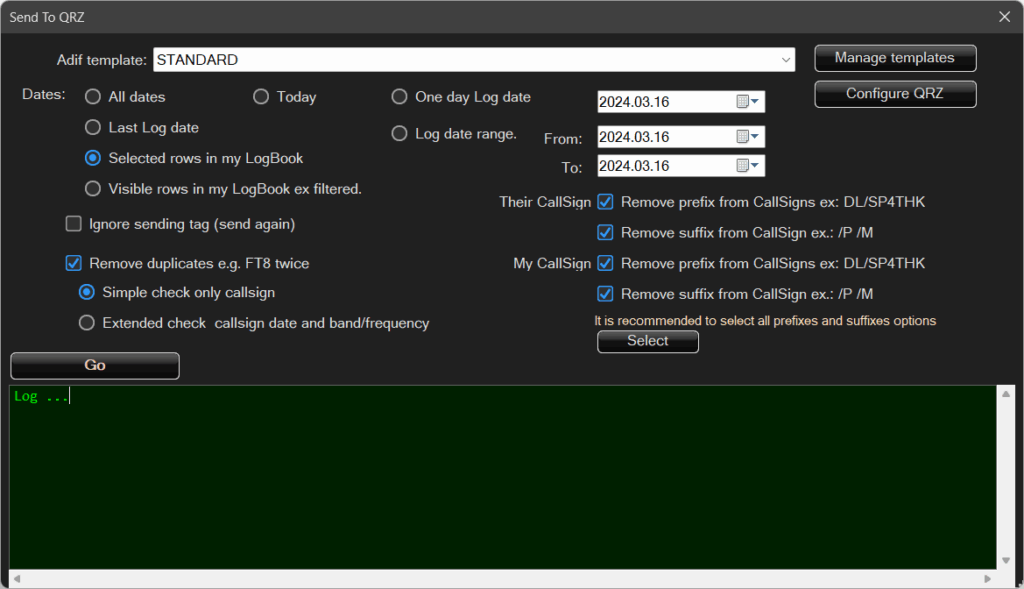
At the beginning, you can select an ADIF template, although the program will suggest the STANDARD template by default.
These are the same templates used when exporting logs to .adi files.
You must then select the range of QSOs to be sent:
- all QSOs,
- by date range, or
- based on visibility/selection.
The program keeps track of which QSOs have already been sent and does not need to resend them.
However, if the user wishes to resend everything, the appropriate option can be selected — Ignore sent flag.
Some QSOs may be duplicated accidentally or due to automation issues, for example when cooperating with digital mode programs (WSJT-X / JTDX).
Different applications may log the same contact with slightly different timestamps, and when importing, exporting, or merging logs, duplicates can appear.
Before sending, these entries can be filtered out to avoid duplication.
Prefixes and suffixes have already been discussed earlier.
Click Start to begin the upload process.
During transmission, the program will report whether each QSO was sent and saved, or skipped, along with the reason — for example, if it already exists in the QRZ database.
Importing logs from QRZ
From the Logbook menu, click Download QSOs from QRZ:

This option works very similarly to Export.
Particular attention should be paid to the option:
Ignore duplicates where the time difference is less than 2 minutes and the frequency difference is less than 2 kHz.
This is especially relevant for digital modes and related software.
The same FT8 QSO on a nominal frequency of 7074 kHz may be stored in different logs as 7075.5 kHz (i.e. +1.5 kHz), and the time may be recorded either as the start or end of the transmission, resulting in additional differences.
Enabling this option helps protect against unintentional duplicates caused by such inconsistencies.
🌍 LoTW
⚙️LoTW Configuration:
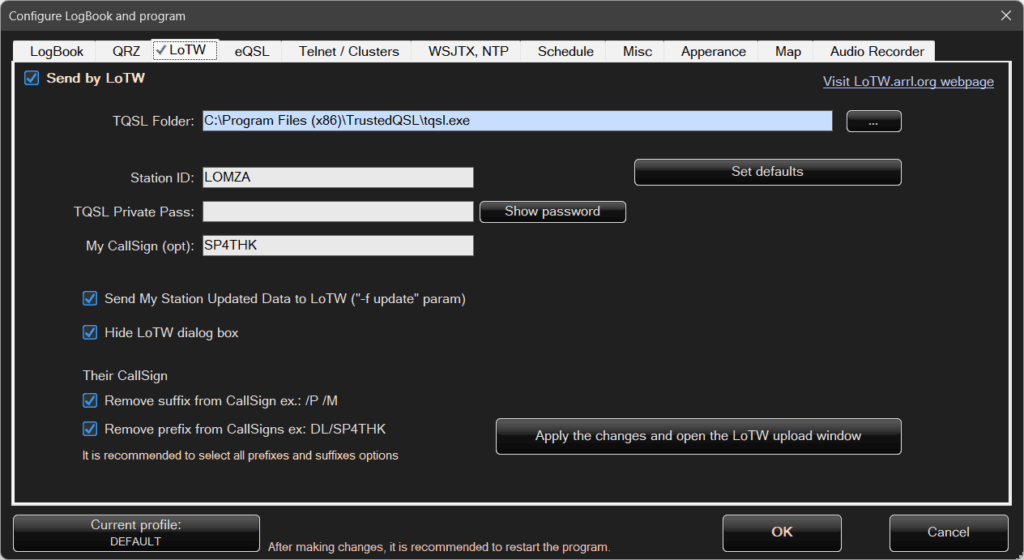
Configuration here is more limited.
To be able to send logs via LoTW, the TQSL application must be installed.
TQSL signs QSOs with a certificate and sends them securely to the server.
You must provide the location of the tqsl.exe file, along with the login credentials and station information.
Exporting logs to LoTW
To send data to LoTW, open the main Logbook window, click Menu, and select Send Logbook to LoTW.
After selecting this option, the following window will appear:

Removing prefixes works in the same way as in the QRZ configuration and serves the same purpose.
📨Sending QSL cards via e-mail.
⚙️ eQSL Configuration
The program sends QSL cards using standard e-mail.
This eliminates many inconveniences related to the less intuitive operation of some eQSL services.
Sending QSLs by e-mail is the simplest approach and avoids configuration and usability issues.
Sent QSL cards can be stored both in the e-mail client and within the application itself.
The program also includes a QSL card generator.
You can design your own QSL card and send it to correspondents, provided that their e-mail addresses are available — either entered during the QSO and saved, or retrieved from the QRZ database.
Sending QSL cards also requires configuration.
Therefore, open the configuration window and select the eQSL tab.
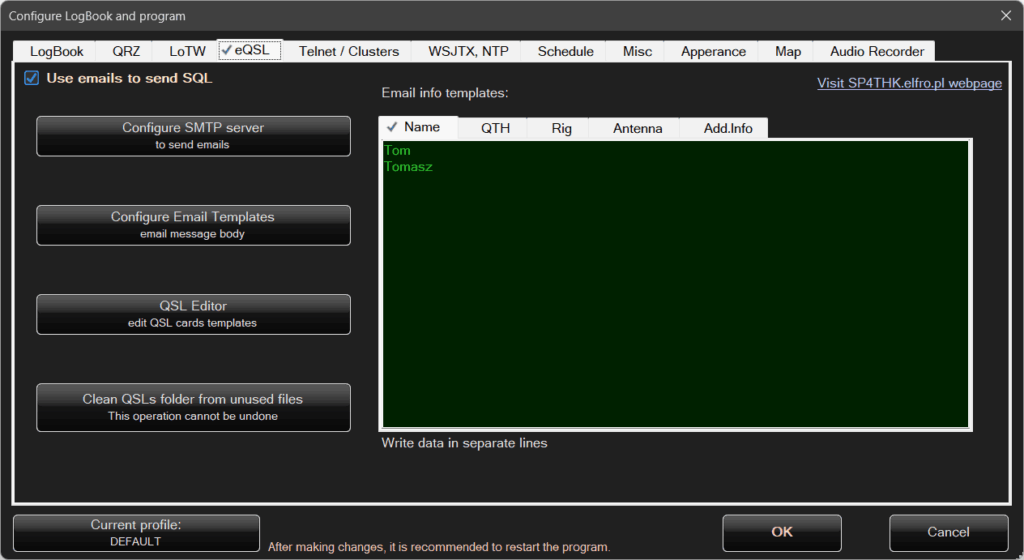
On the right side, there are templates for e-mail information.
Here you enter your name(s), location, radios, antennas, and any additional information.
These entries will later appear as selection fields before sending an e-mail — for example, you will be able to choose a specific radio and antenna.
Each line of text represents a single selectable option.
It is not possible to select multiple lines/options at the same time.
a) Configure SMTP server
E-mails are sent using the SMTP protocol, which is a very common protocol supported by most mail servers.
Exact configuration details and parameters should be obtained from your e-mail service provider.
After clicking Configure SMTP server, the following window will appear:
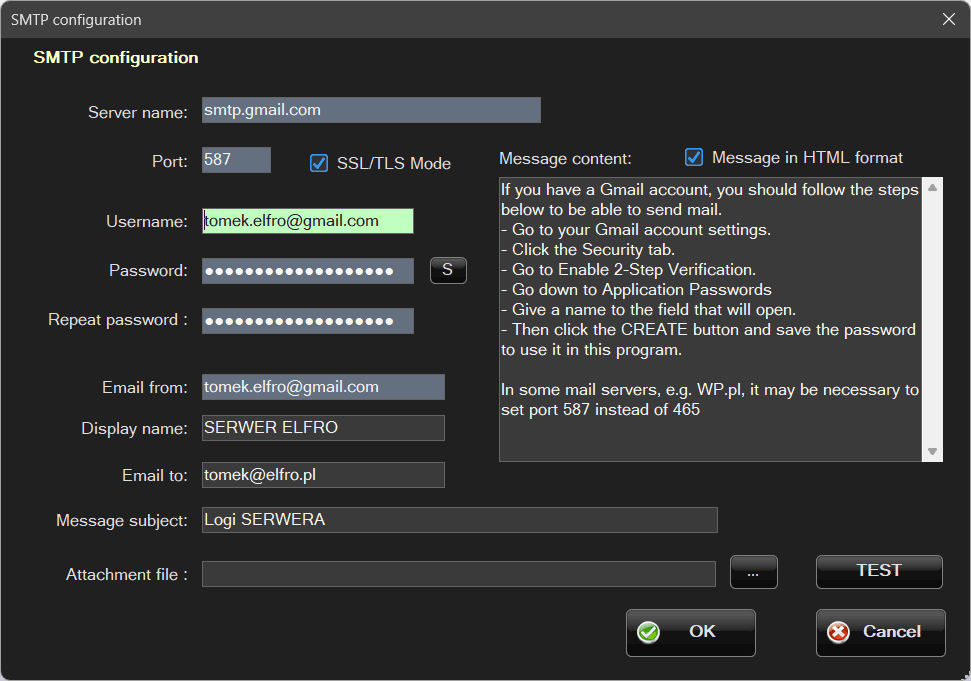
The parameters must be set according to the configuration provided by your e-mail service provider, for example Gmail.
Not every service offers SMTP access for its mailboxes, or it may require an additional fee.
Often, extra configuration is also required in the mailbox security settings.
This is the case with Gmail, for example.
By default, Gmail does not allow “external” applications to send e-mails via the SMTP protocol, but this behavior can be changed.
To do this, log in to your Google account and perform the following steps:
- Log in to your account using a web browser.
- Go to your Gmail account settings.
Click the icon with your initial or avatar in the upper-right corner and select Manage your Google Account. - Open the Security tab.
- Go to Turn on two-step verification, or if it is already enabled, open Two-step verification.
- After enabling and entering Two-step verification, scroll to the very bottom and select App passwords.
- Enter a name in the highlighted Application name field.
- Then click Create and save or copy the generated password to use it in this program.
Fields highlighted in red are required.
However, to perform a test, the program additionally requires the To e-mail address and the Message content fields.
The HTML message format checkbox is not relevant — its value is overridden by the value defined in the template.
b) Configure e-mail templates
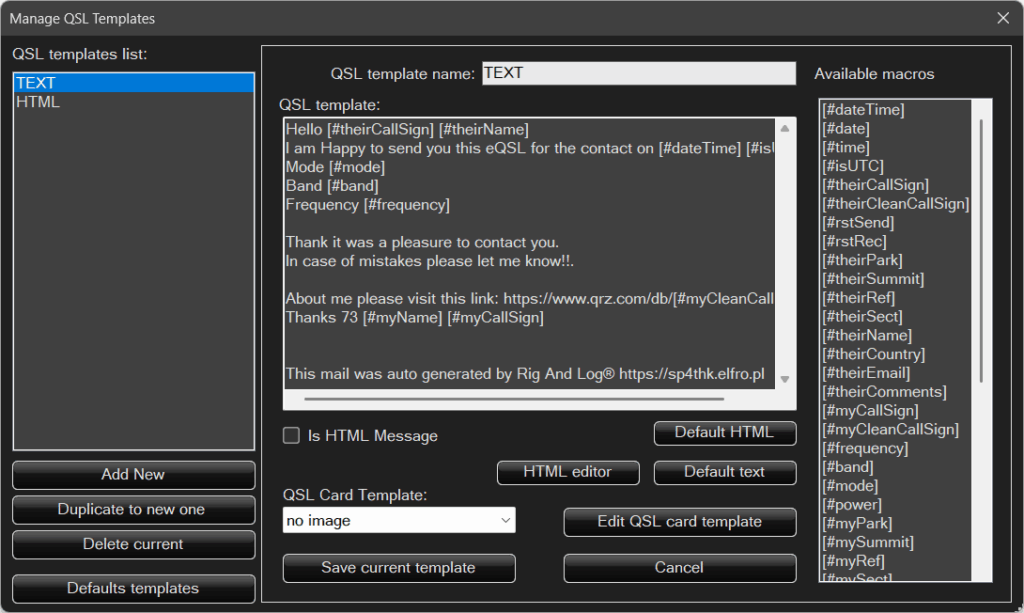
There are two default templates: TEXT and HTML.
You can edit them, delete them, and add your own templates.
On the right side, there is a list of macros.
You can also select a QSL card template.
This is the suggested default template, which can still be changed in the main program window before sending the e-mail.
The message can be edited using an external editor launched in a web browser — TinyMCE — by clicking HTML Editor.
This may seem a bit unintuitive, but you should follow the described steps carefully.
The limitations and slightly unintuitive editing experience are due to the small size of the application, which does not allow embedding advanced HTML editors directly into the program.
Macros may also seem a bit unintuitive at first.
Plain text such as "Hello [#theirCallSign] [#theirName]"
will be replaced during message generation, for example with"Hello W1WW Robert".
Macro names are in English, and their meaning is usually easy to infer.
c) QSL Editor
After selecting this option, a window will appear (with a QSL card already loaded).
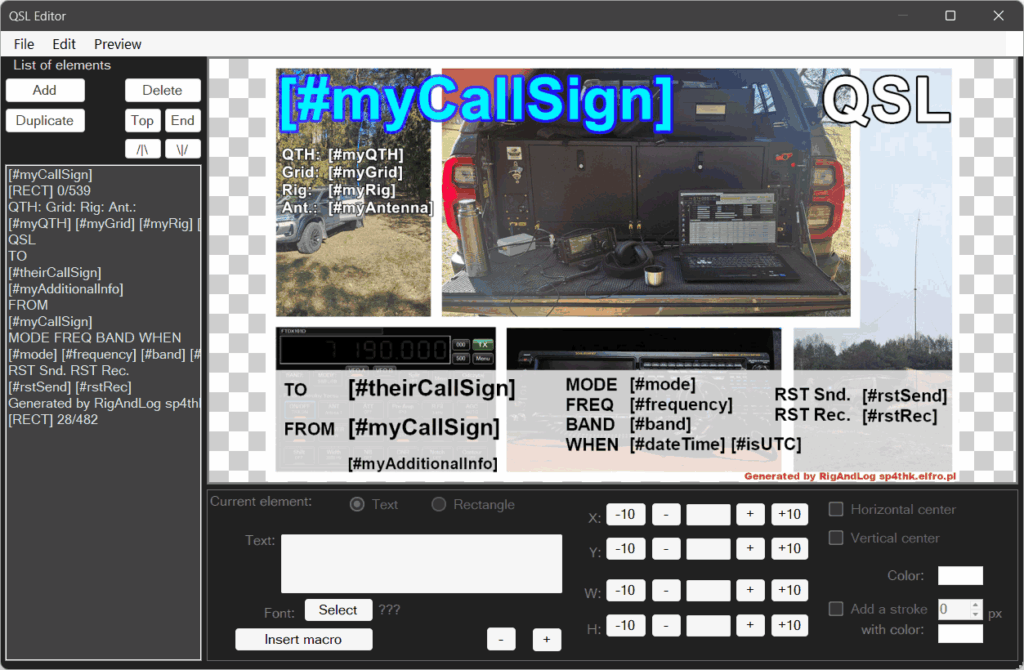
A relatively simple editor is implemented in the program.
First, you need to open one of the example templates or create a new template.
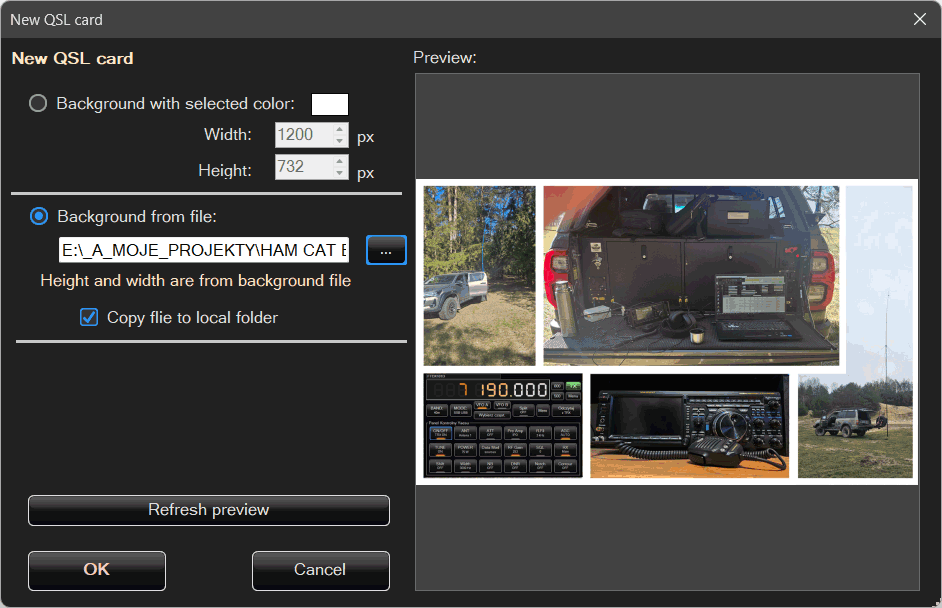
There are two options available: a solid color, or a background image created in an external graphics editor.
It is recommended to enable the option Copy file to local folder.
This ensures that when the program is moved or copied elsewhere, all related data is preserved.
Once a background is loaded, you can add elements one by one.
These can be text or rectangles of any color, including transparency.
Objects can be selected and moved by clicking on them.
However, if a very large background image is loaded, the editor may become slow, especially on less powerful computers.
The goal of the program was not to create an advanced graphics editor.
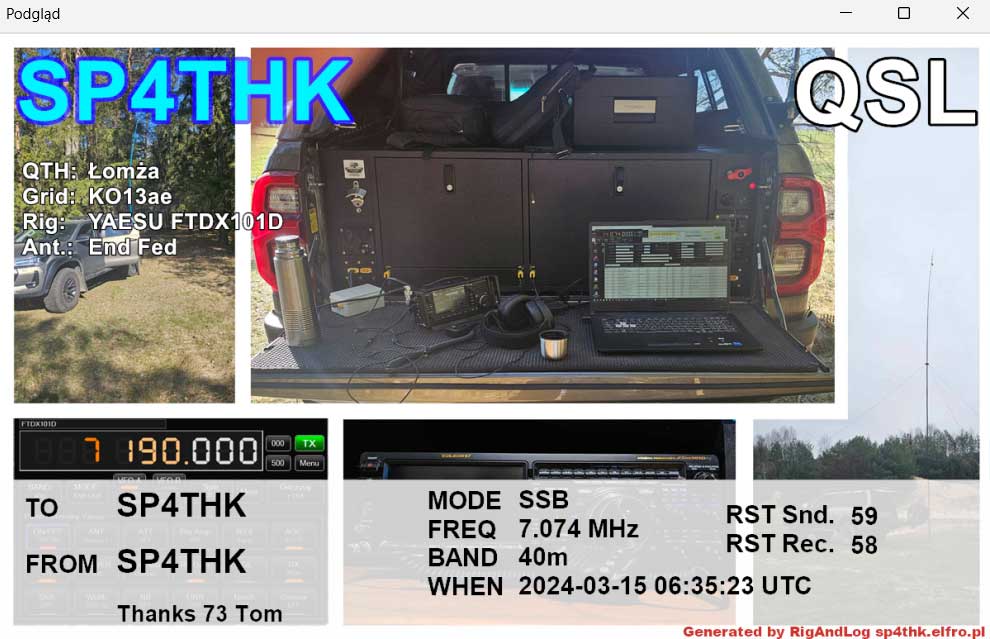
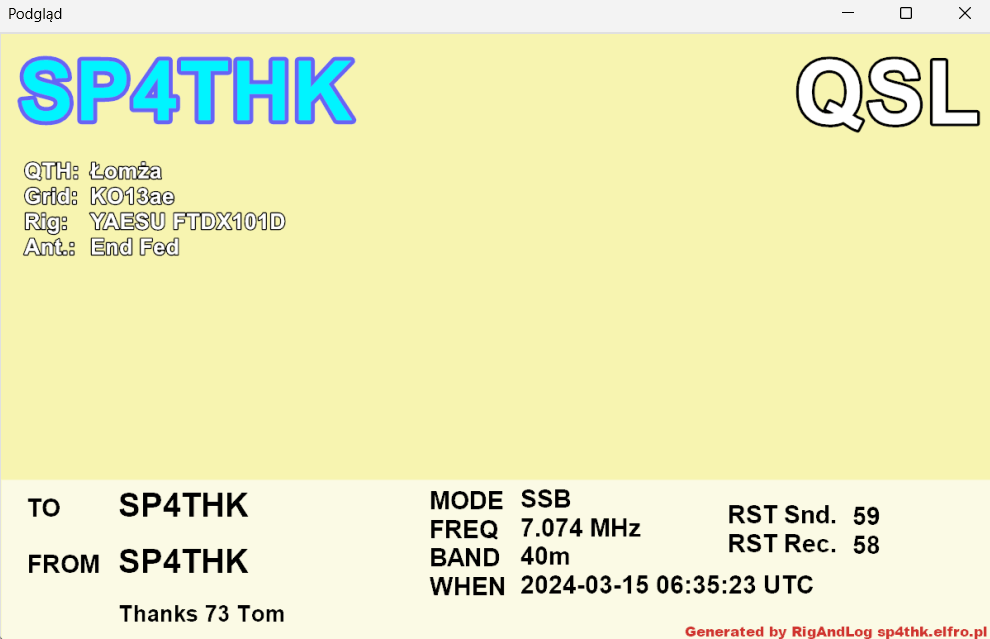
After defining the QSL card, you can preview it by clicking Preview.
Macros will be filled using the first record from the database or default values.
Example default QSL cards:
d) Clean the QSLs folder from unused QSL files
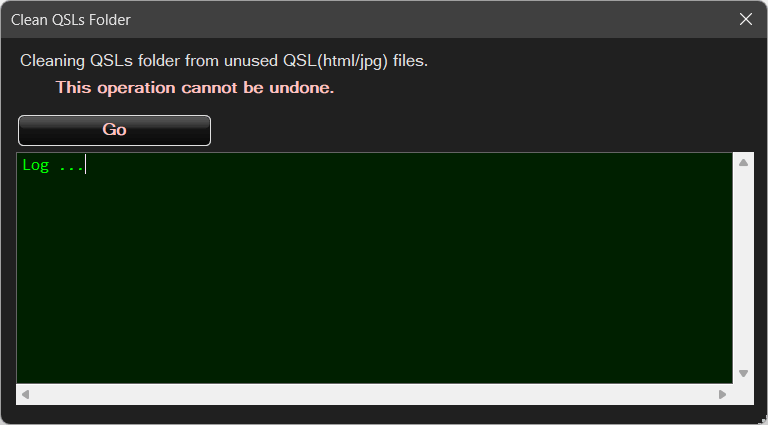
The program can store QSL cards in the QSO details (in the Logbook, after double-clicking a QSO in the list).
Along with the contact details, it is also possible to view sent QSL cards, provided that this option was enabled during sending.
📨Sending QSL cards via e-mail.
Configuration is now complete — it’s time to send QSL cards.
In the main Logbook menu, select Send QSL via e-mail.
A dialog window will appear:
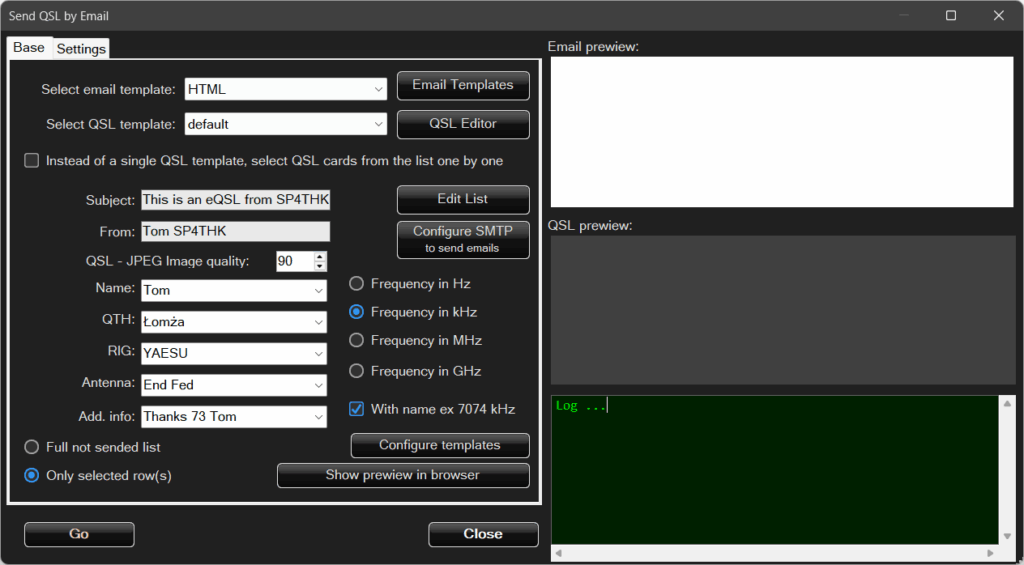
The window contains two configuration tabs: Basic settings and Options.
a) Basic settings
An e-mail message consists of two templates:
- the e-mail message template, and
- the QSL card template.
These templates have already been set up and configured in the options described earlier.
They can also be configured here by clicking the appropriate buttons.
If multiple templates are available, you can select the one you want to use from the list.
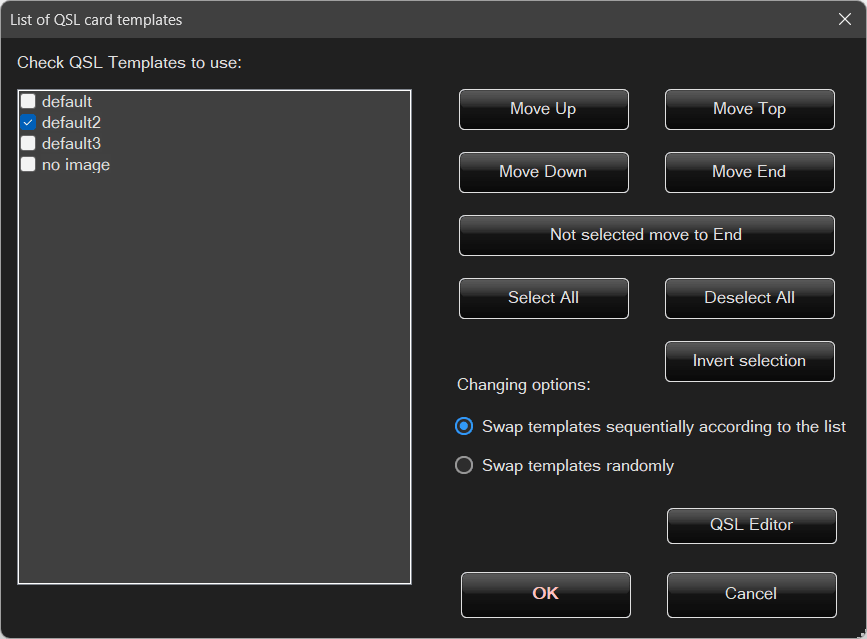
However, let’s assume the user has, for example, 50 templates and wants to send a different template to each correspondent at random.
By selecting Instead of a single template, cycle through QSL cards from the list, the program will rotate through QSL card templates automatically.
How this rotation is performed can be defined after clicking Edit list:
Options
Full list of unsent QSOs – QSL cards will be sent to all QSOs for which a QSL has not yet been sent.
The program remembers whether a QSL card has already been sent and will not send it again unless the user explicitly forces it.
Selected QSOs only – the program checks which QSOs are selected in the list (highlighted in blue) and sends QSL cards only for those, provided they have not already been sent.
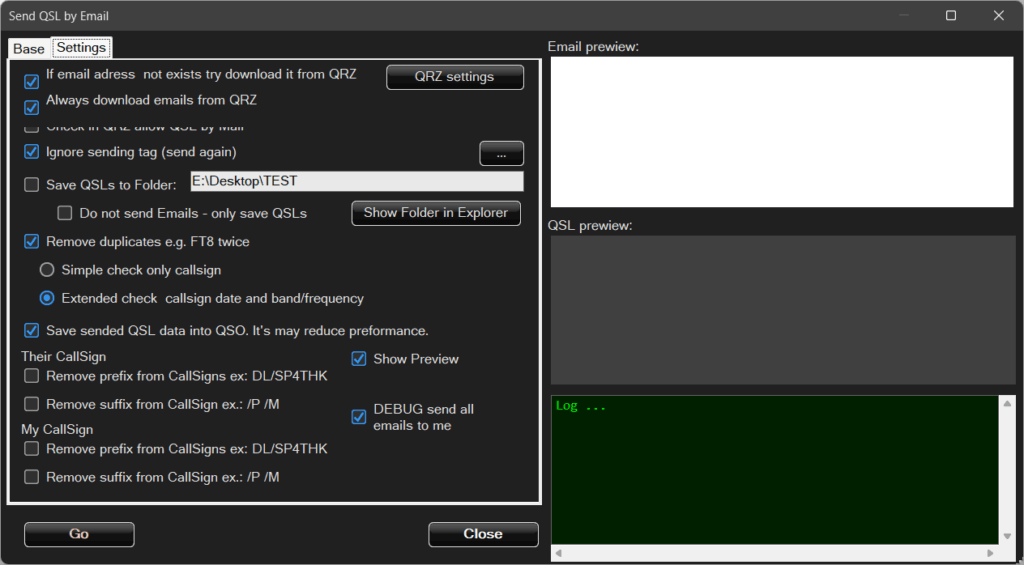
b) Settings
If the e-mail address is missing, try to retrieve it from QRZ and Always retrieve the e-mail address from QRZ – two self-explanatory options that complete or update the correspondent’s e-mail address using QRZ data.
Check in QRZ whether e-mail QSL is allowed – QRZ provides fields where users can specify whether they accept QSL cards via e-mail.
If this option is not enabled by the user and the program checks this setting, the QSL e-mail will not be sent — indicating that the recipient does not wish to receive it.
Remove duplicates – before sending, the program checks whether a similar QSO has already been logged more than once.
There is no reason to send the same QSL card multiple times.
Save sent QSL to QSO – the sent QSL card can be attached to the QSO data.
In that case, in the QSO details (double-clicking a contact in the Logbook), a Show QSL button will be available.
Show preview – this option has two display modes, depending on whether saving QSL cards to a folder is enabled or not.
DEBUG – Send all messages to myself
This option is used for testing the sending configuration.
Instead of sending QSL e-mails to correspondents, all messages are sent to your own e-mail address.
It is especially useful during the initial setup, allowing you to verify how messages are sent and how they look before sending them to others.
📨Click Start to begin sending…